Outer Island Project: The
Sequel
Page 6
Milestone: March 11, 2010, Work Resumes
After 9 Months Long Hiatus!
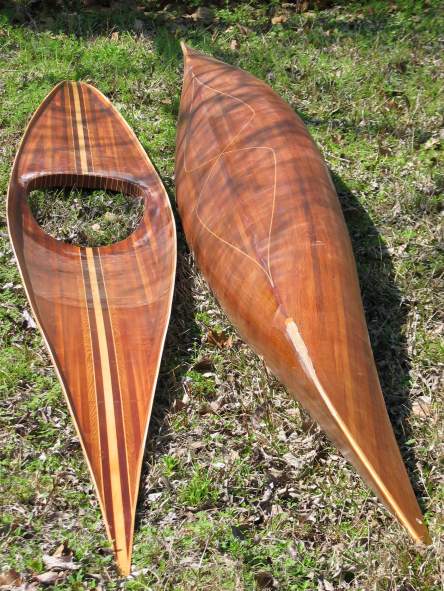
| Here's where we left off: hull and deck glassed inside and
out, coaming riser installed, and even Dynel wear strips added to stem and
stern in a fit of bygone optimism. But no worries; a project like this
keeps well if certain care is taken. Namely, hull and deck had been stored
snugly strapped together with several forms stuffed inside to ensure
everything would still be shaped pretty much like an Outer Island whenever
I decided to get off my dead butt and go back to work on it.
It worked. There are no horrors to be faced today, everything looks
just as I left it. Of course, I checked it closely several times in the
interim also, so that comes as no huge surprise.
|
 |
|
|
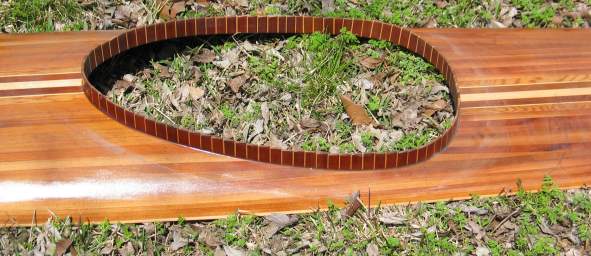
I was exceedingly happy with the way everything was going on
this boat, except for the coaming. It had no sooner gotten put together
than it got stuck in my craw, and never dislodged. So the first order of
business is to rectify the problems, perceived or real though they may be,
and get happy once again. |
|
 |
So out comes the recess template.
I made both cockpit opening and recess templates out of FRP (that's
Fiberglass Reinforced Panel to you) that I use for making telescope
bearings, the shapes having been lofted from Uncle
Nick's book. They're for the Guillemot, and I've used them on all my
boats. It's a nice shape, and my spray skirt fit all my yaks alike. If you
look closely, you may be able to discern the pencil marks betraying the
fact that I am stretching this recess nearly three inches in length.
Or maybe not. It isn't like my photography is ready for National
Geographic or anything.
Anyway, this is what I am thinking about doing. |
|

|
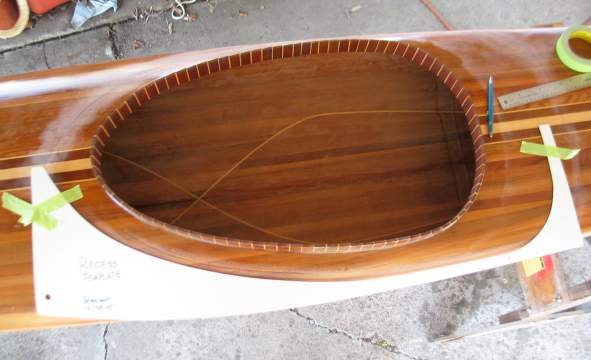
Whoops, looks I ain't thinking about it no more.
You might notice that I sanded around the area the pencil line was
going to go. That's so the line will lay down nice and dark. Remember what
I said about making good bold distinct pencil lines to cut to? No? Eh,
don't worry, I can't blame you, I don't read any of this stuff either.
|
|
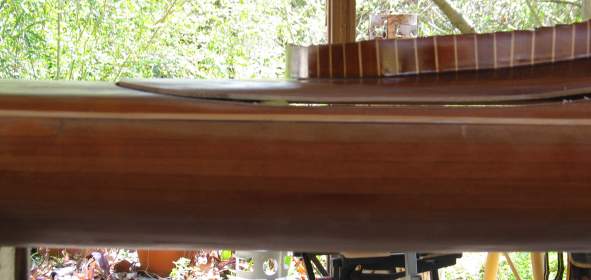
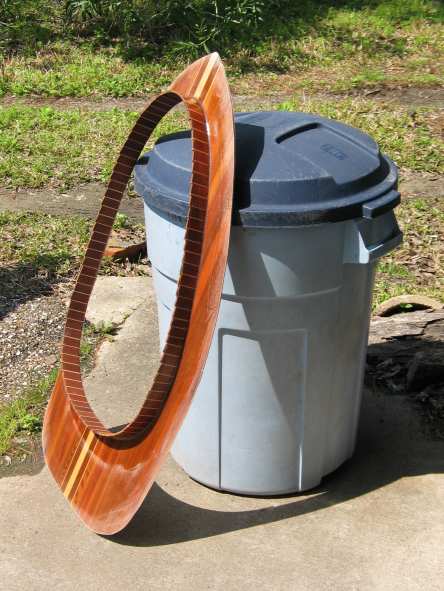
In case you're wondering why I'm bound and determined to
saw out all that work and start over, there are a couple reasons. First
and foremost, I'm a rolling nut, and I want that rear coaming to be just
as low, low, low as I can possibly get it, and I'm not going to get it by
skipping the recess. The photo explains how it works better than I can, so
stop reading this and take a gander at that. Nearly a full inch, not too
shabby.
Another reason is that I got a little careless when
putting that riser together, and you can easily find what I'm talking
about if you haven't noticed it already. It may be a minor deal (no it
isn't - it sucks), but nothing I'm willing to live with when the rest of
the work is coming along so nicely.
Finally, recesses look cool. |
|
|
|
Here at The Sawdust Factory, we're RUTHLESS about quality! Satisfaction
guaranteed! |
Well, it only took nine months to get back to work on this project after
sitting out last year's spectacular early summer heat wave in the first weeks of
June, but better late than never, we always say. Maybe this is a good time to
invoke, as I do so often, the Paddler's General All-Purpose Motto once again:
"I Get There Eventually"
|
|
Anyone who runs around with a wood yak on the racks knows about all the
questions complete strangers ask. Somebody really needs to collect them,
as they sometimes get pretty amusing. The standards are:
"How long did it take to build?"
"How old is it?"
"Is it heavy?" And my favorite: "How did you make it
look like WOOD?!" It can be difficult to remember that we were once
innocent too, so let's try not to make fun of them too much (mmmph,
snicker, snicker). And when I am asked "How in the world do you build
a boat like that?" my standard reply is: "It's built just how
it looks like it's built - by hand, one piece at a time." |
Then I (try to) explain that building a boat is not some dreadful ordeal that
must be endured, but rather, a pleasurable pastime itself; like, say, vegetable
gardening. Only in this one, it kind of helps if you're a vegetable yourself to
get started in it in the first place. And that there are even some people who
get into it so much that they barely even paddle their results much, as building
is their main focus. And still others who do not pretend to paddle at all; they
build kayaks and/or canoes strictly as a hobby wholly unto itself. (And no,
nobody wants to pay thousands of dollars for you to build them one, it doesn't
happen.)
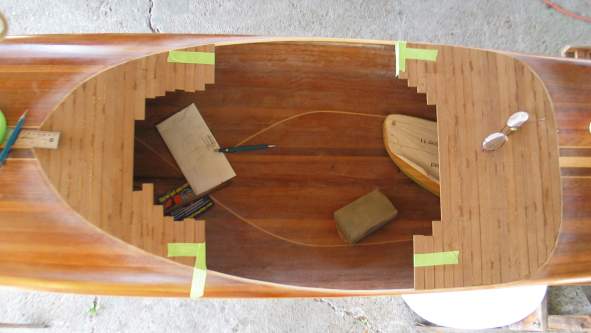
Whatever, here we are installing a recess to lower the cockpit coaming, and
as you see, it is done just how it looks like it's done - by hand, one little
piece at a time. Actually, at the stage you see in the photo above, four at a
time; but still, you must wait for glue to harden at least a little bit before
proceeding to the next set of four. So it helps to have something else to do to
keep your hands busy, and prevent you from rushing things as I am so terribly
prone to doing (it's spelled 'OCD'). In the meantime, it behooves one to think
ahead, and consider things to come, like necessary hardware (foot braces,
screws, washers, etc.) and "software" (webbing strap, bungee cord,
minicell, etc.). Think about the stuff you make yourself, too, like homemade
padeyes, carved hooks for paddle parks, etc. Here, it shall be fashioning toggle
handles for boat-toting as a sub-project to work on while waiting for recess
pieces to dry a little.
|
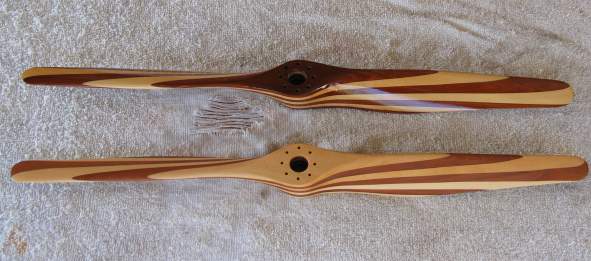
I recently got suckered into carving wooden propellers for
WWI-era replica aircraft, and made my start by carving a few quarter-scale
versions (they're 24" long) as proof-of-concept/technique/method
models. They came out very nice, if I do say so myself, and I am
particularly smitten with the way the redwood and basswood looks together. And,
of course, I had scraps left over from making them, so....... |
|
|
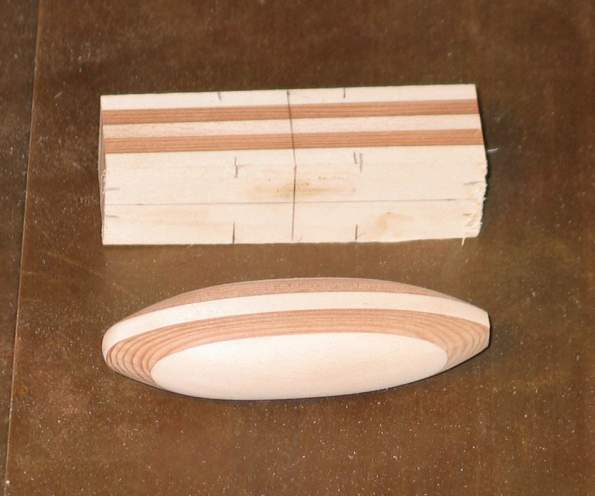
......I naturally got the idea to make toggles using
material which would otherwise be ammo for trash can target practice. I
stubbornly resist throwing stuff away, and relish finding uses for scrap.
I also get a kick out of carving, a very pleasant diversion indeed,
especially when working with such perfect wood species as these; basswood
is every whittler's first choice for its wonderful carving properties, and
redwood is pretty easy to get along with too.
So we're going to do a little wood carving demonstration
for today's exciting episode. Start with a blank that
covers all major dimensions. Or in other words, that is about the right
size. Duh, but you gotta start at the beginning. Anyway, once you got your
blank covering the required size in all dimensions, mark and cut the
profile shape of the front view, then the top view, then the side view. Starting
with profile shapes in all viewing directions is the starting point for
all carving, and will keep you honest. |
|
|
So that's what we're doing here, cutting to basic shape.
Over there --------------- >
Note the "zero-clearance insert" on my band saw.
It's just a piece of door skin plywood taped to the table, takes five
seconds to make and install, works like a charm. |

|
|
Continue doing same, here we are at the sander, refining
the profile shapes. Front view, top view, side view..... |
|
|
When you're happy with that, it's time to shed the boxy
look and go for sexy curves. At this point, it is well to practice a
little method and discipline, for executing consistent and symmetrical
roundiness is nigh unto impossible if you just start by just trying to
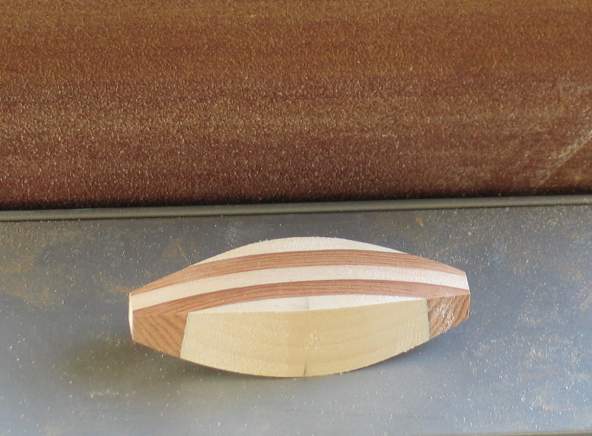
carve or sand roundy surfaces by eye. Chamfers are where it's at.
Chamfers, or beveled edges, are far easier to keep even, consistent, and
accurate. For instance, you can see how uneven, inconsistent, and
inaccurate my chamfers are in the photo at right. Ugh! But you get the
idea, right? See how the corners can be judged for evenness? The football
shape on either side? This is how you most plainly see that everything
looks the same all the way around. |
|
|
When the chamfers are as accurately made as you care to go
with it, then knock the edges off them. Rinse and repeat, keep knocking
off corners until your surfaces begin to look more curved than faceted.
Again, take it as far as you can stand to go with it, for working flat
surfaces is a million times easier to gage by eyeball than curves ones.
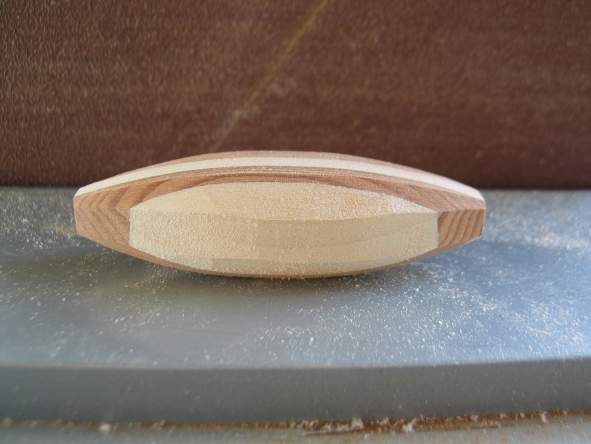
When you finally turn to sandpaper for true rounding,
always use a sanding block. Always. Otherwise you're just begging for
queasy lumps and dips. I used minicell scraps about 1/2" thick to
back the sandpaper when working on these guys, and it was just the thing. When
hunting that elusive perfectly curved surface, use the grazing angle
shadow of a direct light source. The sun often works well, as does a work
light on the bench. Do not rely on overhead lighting unless it comes from
a single source. The shadows knows, as they say, and if you look closely
at the photo at right, you can see for yourself what it tells you. Round
off the ends as the last step. Keep all steps separate and distinct. Start
with a square blank; go to basic profile shapes; chamfer; work down
chamfer edges; round off; finish ends. Try to avoid mixing or blending
steps to arrive at the most accurate, symmetrical final shape. |
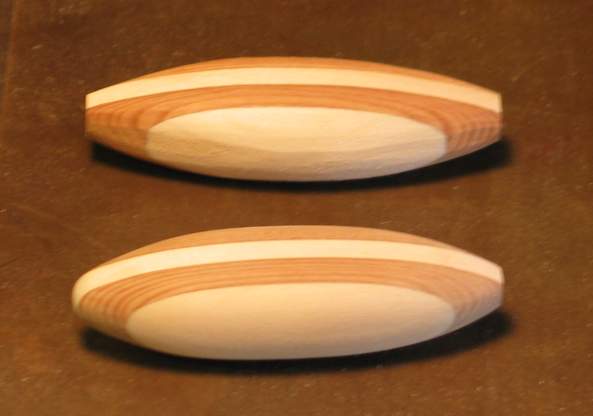
|
Or get out the lathe and turn 'em in about five minutes each, which is what I
would have done if I needed them pronto. But again, making small parts like
these are best done well in advance, when you are far more likely to make them
just exactly how you want, or even toss 'em and start over if they're not going
your way. When you're in a rush to launch, you tend to settle for less. And
small details are very often what makes the difference between a nice result
...... and a truly impressive one.
Rewind to Home Page
Rewind to Page 2
Rewind to Page 3
Rewind to Page 4
Rewind to Page 5
You Are Here: Page 6
Fast Forward to Page 7
Fast Forward to Page 8
Fast Forward to Page 9