The Sawdust Factory Presents
Outer Island Project: The Sequel
Or, One Really Bad Case of Deja Vu
Yes boys and girls, we're going to build another Outer Island sea kayak! Why? Because I finally figured out that the only thing better than an Outer Island is two Outer Islands. But seriously, back in 2005 the original was built rather in a hurry, in just 29 days to be exact, and there are things that could have been done better. It also now has thousands of miles on it, repairs piled upon repairs, is rather on its last leg fair and square, and just looks like hell in general any more. Also, I have picked up an awful lot of experience since then, and now wish to apply it to a much-improved example of my very favorite boat in the whole wide world to paddle.
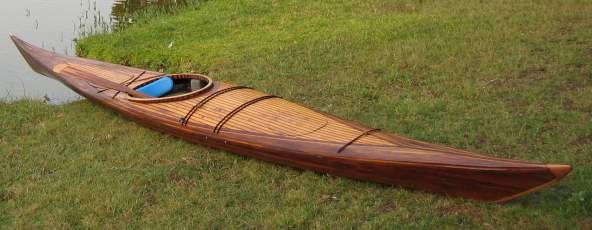
The Original Outer Island

And the new Outer Island
|
|
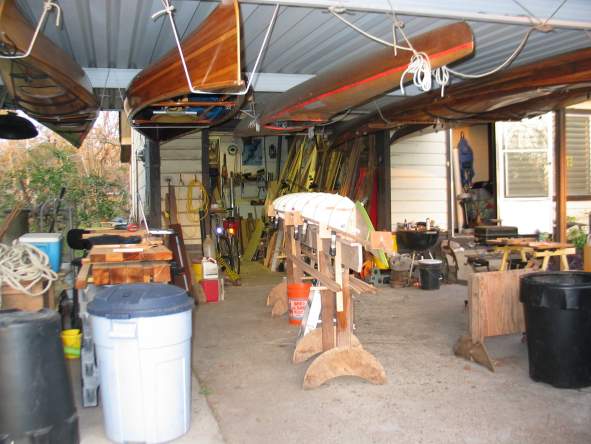
The Shop First, it's absolutely imperative that you have a serious shop if you mean to build a serious boat. What can be more serious than a one-car garage and an open air two-place carport? It may not look like it, but there is a full compliment of excellent woodworking tools present: a full size 3hp table saw equipped with extension wing with built-in router table; a 10" radial arm saw; two band saws; a 6x48 stationary belt sander with 12" disc; jointer; planer; dust collection system; and more, but those are the major items. Note the stacks of lumber tucked into every crevice in between. Serious is what you make of it, and I'd rather work with what I have than lament what I don't. Note the hanging boat storage. Sometimes I wish I were a taller man, but a passion for boats and airplanes keep me happy to be at the sawed-off size of 5-6" x 160 lbs. The boat are, from left to right: the Squeedunk Kayaks Cormorant 16 hybrid, the Northwest Canoes Merlin, a kevlar K-1 sprint racer from the 1986 Olympic Trials, the original Outer Island, and a self-designed 17'-6" x 19" ultra low volume kayak that's the wood equivalent of a traditional skin-on-frame qajaq. The black thing that looks like a flying saucer at upper left, next to the Cormy, is the lid of a Weber BBQ Kettle hung to protect the carport roof from the chiminea's hot flue gases; the chiminea being my version of a wood stove. Having some sort of stove or fireplace to toss scraps in makes winter woodworking much more palatable, and comfort's important to turning out nice work right down to the last details. The lower half of the Kettle became a redneck style table, seen at right. I find a small Weber propane grill a lot easier to use, and just as good for cooking tasty supper vittles.
|
|
At the center of all the fiery action stands the strongback, with all forms aligned and tweaked, everything ready to go. |
|
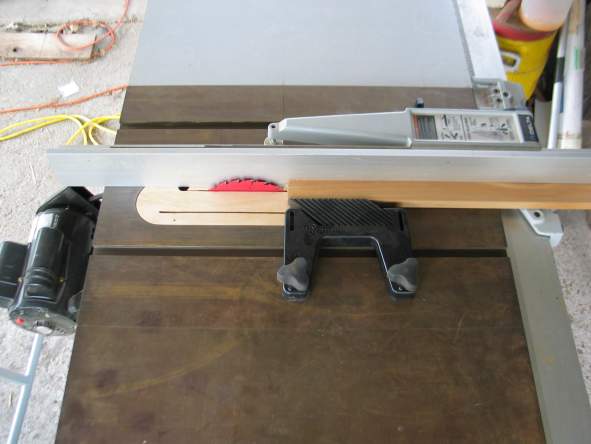
The Saw A stripper project naturally begins at the table saw, so let's talk about that for a minute. Got a couple things to mention here: First, the better table saw is belt-driven, and not direct drive where the blade actually mounts to the motor shaft. Those things are scary screamers that make it difficult to relax (as much as you're going to relax while operating a saw), and belt driven saws are silky smooth and run much quieter. Drive into the big city and buy your table saw from a reputable dealer who will set up and tune it properly, or take the time to learn to do so yourself. Don't just slap it together. Safe enough truism: Even a crummy saw with an excellent fence is preferable to a top-flight saw with a lackluster fence. This is a Delta Unifence, the other best choice is Beismeyer. For cedar strips I use a Freud Diablo 7 1/4" 24-tooth rip blade. It costs about $11 at the local Ace Hardware, the kerf is a thin 1/16", and "sub-diameter" blades run smoother. Particularly when used with a blade stabilizer or two, it purrs like a kitten. Zero-clearance throat insert is made from 1/2" Baltic birch plywood, uses four allen head set screws (from the hardware store small parts bins) to serve as levelers. This one has two slots: One for this blade, the other for a standard 10" blade, plus a finger hole to lift out easily. I have others for 45-degree and 30-degree blade tilts. Normally I detest all the gimmicky little goo-gaws and gizmos seen in woodworking specialty stores and catalogs, but this magnetic featherboard is a distinct exception. I love it! The featherboard must be adjusted with every strip ripped from a board, and this baby makes that adjustment a snap. The magnets are plenty powerful so there's no slipping, and all in all it just plain works. A quarter-turn of each knob releases or engages its magnet. At $40 it's not the cheapest thing I've ever seen, but I don't mind paying if I get my money's worth. I highly recommend it. |
 |
|
|
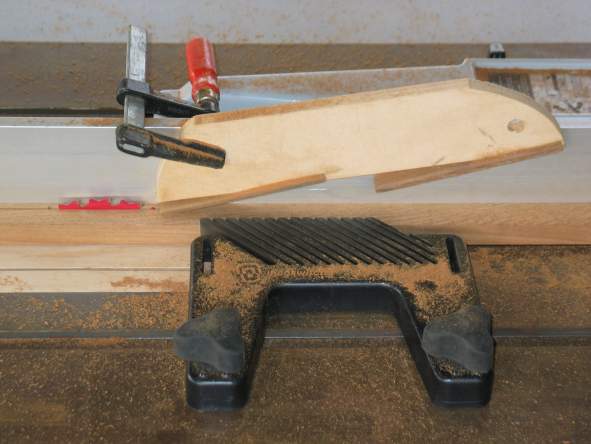
Yeah, now we're kicking up some sawdust! I wanted to repeat
the plug for the cool magnet featherboard in case you weren't paying
attention, and show the shop-made
springboard.
Springboards are the alternative to featherboards, also called fingerboards. I like 'em because sometimes featherboards are overkill when all you really need is just a dab of pressure. You can see that here I'm only using the front half in this case, because I hardly need any pressure at all. Applying too much pressure makes it tough to feed the stock easily, and my goal is to rip each strip without stopping, or stopping as few times as humanly possible. Keeps the results smooth. Smooth results require less sanding. We called it "trickle down economics" back in the 80's when Reagan was Prez. |
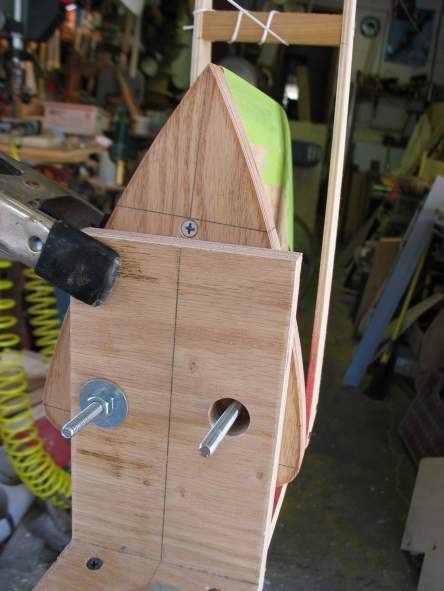
| The Strongback As I began writing this, I wondered what, exactly, a 'strongback' is? I reasoned that we have a set of forms, a bunch of stanchions, and a beam upon which to connect it all together to form a mold upon which to shape a boat. Then my attention span hit its limit and expired. So here the term 'strongback' shall refer to the whole shebang, and I shall endeavor to get on with my life. Thank you. What I intended was to show how I learned to build killer adjustability into my strongback. This is an external strongback, by the way; an internal strongback is a narrow beam, usually a 2x4, that passes through holes in the center of each form. Which is better? It's largely a matter of preference, with plenty of persuasive arguments possible either way. Which suggests that the term 'strongback actually refers to what I call the 'beam', or more generically, the 'spine'. Oh look, a squirrel! First, I glue and screw a couple long thin pieces of 3/4" plywood together as a right angle, then cut it into a series of 3- or 4-inch wide pieces to make stanchions like the one seen here. They're fastened to the T-beam or box beam spine with drywall screws and a square. Then a string is strung and the forms are placed temporarily, as per the plans, using spring clamps. When all is aligned fairly well, holes are drilled through both form and stanchion with a 17/64" bit, or just enough to permit 1/4-20 machine screws to pass through, sometimes with a tap or two from a hammer. Then the holes are enlarged to 3/4" on either the form, or the stanchion, one or the other, as seen here. Fender washer and nuts complete the picture, and now critical alignment can be made and locked in easily. The screws, nuts, and washers aren't expensive, and just as with the spine beam, are kept around for the next project, and then the next, and the next... As a working example of this alignment business I'm talking about, please note the catty-wampus form-stanchion relationship seen in this picture. The form is actually aligned true to the string; it's the T-beam spine that's wandering. It's about five years old, and is stored in a drafty damp shed where something of a noticeable twist has developed at one end. Not a problem, the forms are not aligned to it; but rather, they are aligned to the string. For the hawk-eyed among you, yes; the stanchion needs to be trimmed, and the form taped. |
 |
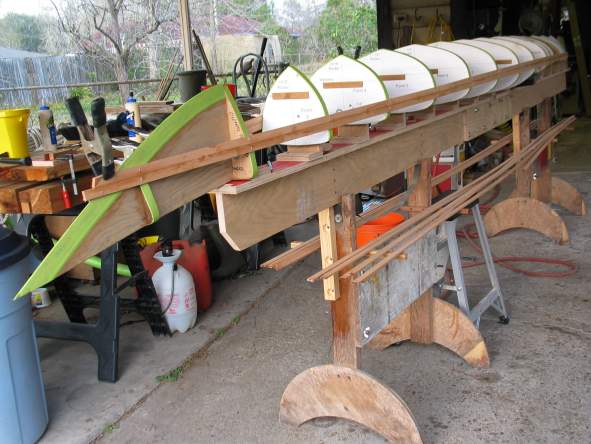
Milestone: First strips installed February 12, 2009
|
|
The forms are taped, of course, so the strips aren't
permanently glued to them.
Speaking of glue, it's a common question so I'll say a word or two right now. Any waterproof carpenter's wood glue works. Not white glue like Elmer's, but the yellowish-tan colored stuff like Elmer's Carpenter's Wood Glue. I use Titebond II myself, and am trying to discover whether I like Titebond III or not. Aye, behold me cross trees on the topmast, y'lubbers . . . arrrr! Um, I mean, check out the pieces of scrap I've screwed to the stand legs to make racks for my strips. Do this; it's super simple and incredibly helpful. I feel like a king-sized knucklehead for not thinking of it about ten boats sooner. Ditz. You may be wondering why the top of the T-beam has been painted red. Well, a string was pulled from end to end, and then a dusting of Krylon red was given, to impart an accurate centerline, that's why. But that was before I decided that the spine's general overall stability was more than I was willing to bet all this work on. I mean, it's bare plywood and it lives outdoors here on the incredibly humid Texas Gulf Coast, c' mon. So I painstakingly line up everything, and I mean everything, to a string that gets re-stretched any and every time I need to refer to it. I never want to have the least question in my mind, ever, as to whether my boat is arrow-straight or not. |
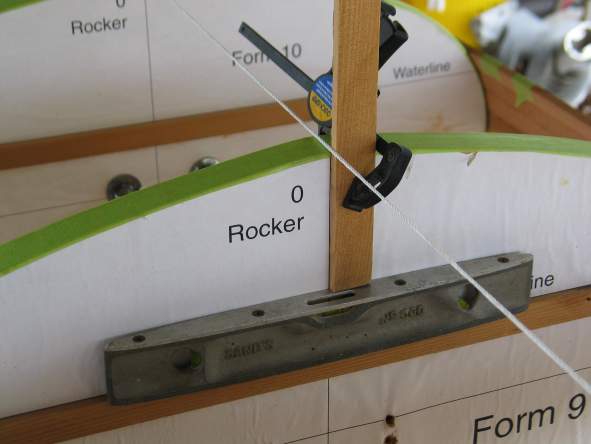
Well, that certainly didn't take long: several emails already asking how I line 'em up. First of all, there are a million different ways to accomplish truing up the forms, and I normally follow whatever instructions are given by the boat's designer pretty closely, if not exactly. It also depends on whether an internal or external (as seen here), strongback is used. Only one thing's constant: the finished boat can only be as straight and true as the mold you build it on, so take your time and do it well. Also, obtain canoe and kayak building how-to books and read them, you've been watching too much TV lately anyway. Canoes often use a built-up box beam strongback from which all alignment measurements are taken, which is how I did it on the Merlin. Jay Babina, the Outer Island's designer, suggests using a simpler T-beam strongback, and aligning the forms to a string using a bubble level. Whatever the designer may recommend, it's safe to assume he's a benevolent soul who knows what he's talking about, and wishes you unbounded success in life. So, in this particular case: See the horizontal wood strip tacked to each form? They're carefully lined up with the waterlines given on the plans, and form a narrow ledge upon which I can rest a small spirit level. The level is held in place by a vertical piece of scrap strip that's clamped to the form precisely lined up on the vertical centerline. So when this vertical strip just touches the string, and the bubble's centered, she's ready to tighten down. If you want to know more, please order a set of plans from Jay and don't make me write his instrux all over again. Thank you. I align all forms roughly, then come back and tweak 'em from one end to the other, then again, and repeat the process until errors become extinct. I make it a relaxing days-long process since I'm prone to rushing things in my excitement to "get-r-done", and have found I'll succeed only in getting myself wrapped around the axle trying to get it all perfect in one pass. For the end forms I use a plumb bob to ensure dead-eye perfect alignment from tip to tip. |
 |
Navigate This Site:
Big Time Guru Boat Builder Links; Some Commercial, Some Not; All Excellent Resources:
Jay Babina's Outer Island Sea Kayak Plans and "1st Roll" DVD
Laughing Loon Classic Canoes & Kayaks Shop Notes by Rob Macks
Chesapeake Light Craft - Very Good Source for Shop Notes, Tools, Books, Etc., Etc., Etc.
John Caldeira's Building Pages
Back To The Sawdust Factory Home Page
Email Kurt Maurer at NGC704@aol.com