Outer Island Project: The Sequel

Page 8


Milestone: June 1, 2010: Closing the Clam! 


"Closing the Clam" is the picturesque term my friend Tony Olsen uses when referring marrying hull to deck. The first time I heard it I lost all ability to think of it any other way. So closing the clam it is, forevermore....

It's a huge milestone, right up there with completion of stripping. All the clutter suddenly becomes a BOAT, and one can begin to see blinding light at the end of the tunnel. It is sweet moment in boat building; very sweet indeed.

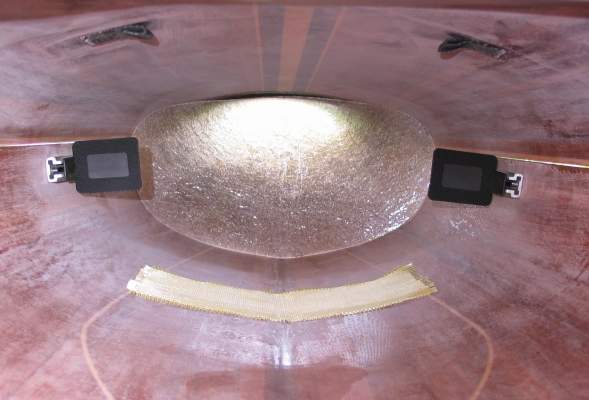
There are several last things that need to be done beforehand, and approximately half of them get thought of after the fact. Here are the ones that got thought of before, when it was yet useful to have such thoughts: locate foot braces, add wear pad for heels, add underdeck bungee anchor loops, preliminary fit bulkheads.

I'm using kevlar for the wear pad, and have topped it with 9 oz plain weave e-glass. The foot braces are 10" Yakimas, as ordered just like that from Sweet Composites, a top-favorite vendor.


I got started about 10:30 in the morning, fully expected to take all day. By 3:00 in the afternoon I was in my Nordkapp happily bashing Galveston Bay waves to cool off, and I swear I never even thought about hurrying. I guess this poor boat has been half-done for so long it just jumped together before I could hesitate one more time.

Note the cradles holding the boat just so. To eliminate trying to work on boats that are swinging merrily about on slings, I use the forms as patterns to make properly shaped cradles for all possible working configurations, and screw 'em to 2x2's, which the tops of my work stands are notched to accept universally. The ones in use hold the boat on side as shown, and flip 'em over, they cradle the deck inside-up. The pair leaning on the stands hold the hull upright, and the deck topside up when flipped 180 degrees. All cradles are padded with 1/4" of minicell. The cradles for the hull, and the ones shown in use here, will remain useful for refinishing and repairs.


I plan to add a full compliment of sea kayak deck rigging, including lift toggles, lifelines, and everything else. In slack moments I've been playing around with ideas, and here are a few of the results. I figure after about another 9000 carving attempts I'll be happy with something that marries a cool shape to a strong handle that can actually be used.

The smallest item is a paddle park hook. I've been busting my left fore-knuckles on the #&^$#$ Valley skeg control knob for too #$@&# long now, and this baby WILL be as discreetly located and low profile as possible.


Here's a subject that pops up with routine regularity: adding graphics to your project.

I've done 'em in the past on my first few boats, then got out of the habit on subsequent projects, but decided to get back in the game, to at least add some sort of identifier to my equipment - just in case. I mean, I can just see myself trying to convince the cops that my boat is really mine if it were ever end up jacked or something. I need to get better about putting my name and number on all my stuff, or I'm liable to regret it some day.

At any rate, the idea is to use ink that doesn't run, on some sort of paper that becomes transparent when wet. As in wet with epoxy, of course, but you can test your stuff with water to get a quick idea of whether it's going work or not. Rice paper is what's usually recommended, but I've heard of people using vellum, tissue paper, silkspan, etc., etc., etc.

Most builders whip up something on the pooter and print it, and that usually means that an ink jet is going to be involved. Ink jet printers use ink that can bleed and/or run, but not always, so be sure and do a test sample first.....


.....like this, which I made up in 2002 for my first wood boat.

In my case, I went to an art supply store and bought a small roll of rice paper, which appears to be a lifetime supply. I drew my own graphics by hand using India ink, which is roughly equivalent to chiseling your stuff in granite as far as permanency is concerned. The test was really rather a mere formality than anything, but I really wanted to see how the process works before committing to the boat.

Laser printers use toner instead of ink, which is colorfast and won't bleed or run. If you don't own a laser printer, get your local Kinko's/Ridgeway's to do the job, and be sure to specify laser printer. They can do color, and should know all the finer points like running the rice paper on some sort of backer paper to prevent the jaws of death inside the machine from munching out, etc.

Under the fiberglass or over it? If you ask ten boat builders that question you're gonna get fifteen answers. I've heard objections that the paper will interfere with the cloth's bond to the substrate (wood), but come on ...... I have to believe that the epoxy will bond to everything alike, and that the effect of rice paper would be closer to a fiberglass cloth doubler layer than some sort of release agent. Maybe if a sizeable piece were involved, you might go above the 'glass to prevent anything coming between your 'glass-and-wood bond.

But laying it down under the glass will result in optimal transparency of paper, as seen at left.


And here's what it looks like when freshly applied atop the glass. Transparency of the paper will improve with additional coats of epoxy and a little sanding, but it refuses to completely disappear as in the above photo. This is the first time I've applied a rice paper graphic on top of the lay-up as though it were a wet-slide decal, and I shall endeavor to avoid doing so in the future. Put me down as in the under-the-glass camp.


Here's a shot of the cockpit recess, which I'm really happy with! The top of the coaming has been lowered one full inch over the original Outer Island, which may not sound like much, but is pretty significant considering the original is pretty darn low to begin with.

Also note the strip widths you see in this picture. I've used the usual 3/4" wide strips on most this project, but went to 3/8" wide strips for the first four courses above the sheer line (the hull-to-deck join line, which is the bottom of the "white stripe" you see here) to make the radical curve from side to flat aft-deck.

I'm now waiting for the epoxy to cure for a week or two or three before varnish. Is this fun or what?


Whoops, wait a minute, let's back up just a second and talk about the dreaded END POURS! 


If woes involving weddings are one of the mainstays of Dear Abby's column, then end pours surely rank right on up there as staples of agony for the boat building forums.

Let's cut to the chase here - I am repelled by the very idea end pours. Epoxy is very heavy, and very expensive, and when it is mixed the chemical reaction generates heat. How much heat, you ask? Why, enough to cause a boil over, so it is recommended that you stick the end of the boat in a bucket of water to keep it cool! Other unpleasant calamities include tales of dams bursting and unleashing gushers of goo all over the project. Fun, fun, fun.

Surely there has to be a better way?! Why, of course there is, and you may depend upon us here at The Sawdust Factory to serve it to you on a silver salver. 

How 'bout let's just shape a block of cedar and glue it in instead? Like this?


It accomplishes everything an end pour is supposed to do at a fraction of the weight, expense, and stress. Installation is a relaxed and perfectly controllable affair.

The end block doesn't have to fit perfectly, that's what thickened epoxy is for. Use it as both a bedding compound and glue, and clean up all the squeeze-out you conveniently can . . . and it's all pretty convenient. Paint with plain epoxy afterward to ensure a waterproof installation. After the deck is installed, the air space above the block will not be a problem.

In this photo, the anchor hole liner has been installed, but not yet trimmed. Some folks go with just a plain drilled hole, others use a protective liner made of wood, brass or copper tubing. I tend to like plain ol' 1/2" PVC pipe from the hardware store. All approaches work equally well. I consider liners to be cosmetic decorations.

If you still insist upon end pours, at least follow the advice of the True Greats in kayak building, and "thicken" the epoxy very coarsely and generously with all manner of cheap filler material such as wood shavings, scraps of styrofoam, things like that. Vermiculite would be about perfect, that's the stuff that looks like styrofoam crumbs you mix into planting soil to make it airy and loamy.


There, stick a fork in me, I'm done.


Rewind to Home Page

Rewind to Page 2

Rewind to Page 3

Rewind to Page 4

Rewind to Page 5

Rewind to Page 6

Rewind to Page 7

You Are Here: Page 8

Fast Forward to Page 9