Outer Island Project: The Sequel

Page 4


Take a careful look at the upper courses of strips in the picture at left, and in particular note the twist in some of them. They go from vertically oriented at the stem to nearly horizontal amidships. While it isn't difficult to twist these strips like that, getting them to stay that way can be whole 'nuther story altogether. And that's what we're fixin' to talk about right now.

The first time I built the Outer Island, I managed these sorts of strip situations the old-fashioned way: with brute force and lots of staples and nails. To this day I can remember getting those strips installed only with a certain amount of trauma. In short, it was neither relaxing, nor fun to do.

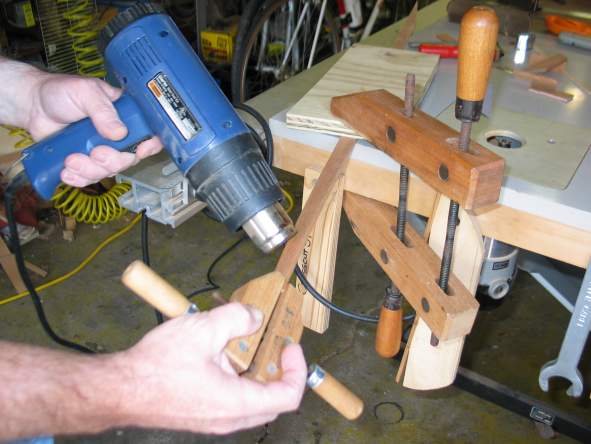
This time around it is actually both fun and relaxing. The heat gun made all the difference. With it, you can introduce the required twists into a strip and freeze them there so that the strip lays docilely in place as if it were born for the job. 

Heat guns look a lot like hair driers, but you really don't want to get them mixed up. Hair driers blow nice warm air, and heat guns deliver red hot air that literally toasts wood surfaces when working particularly stubborn bends or twists. No joke, they run very hot indeed, so be careful where you set 'em down, too.

It's always important to hold the workpiece securely for best results; note how I've clamped this strip to avoid leaving dents behind. Also note that I use a clamp on the twisty end so I don't burn myself. Spring clamps work especially well for this application, though my miniature hand screw clamps look cooler.

Go for a little too much bend or twist, as there will be some amount of spring back, or relaxing, after the heat treatment. If you get too much, it's easy to take some back out. Heck, it's even easy to re-twist in the opposite direction when you mess up and go the wrong way. Not that I'd know anything about that . . . 

Apply heat to the inside, or compression, area of the curve for best results. Can't explain the science of it, but that's what works.


Milestone: Last strip added to hull March 6, 2009


Ah, there we go, got the hull all stripped, installed the external stems, and started sanding. Then the hull is wetted down with water, and I mean really wetted down. As in good 'n' sopping wet. This accomplishes two things: First, it gives a preview of how it's going to look when finished, and second, it swells the wood slightly and goes a long way towards closing staple holes and small gaps.


Tell you what, after all the woodworking I've done, I've come to know a little bit about sanders. So let's talk about them for a minute.

First of all, get variable speed if you can possible swing it. Being able to slow 'er down a little is like being able to switch to finer grits just by dialing the little wheel. Very handy.

The 6" right-angle Porter-Cable random orbital sander (or ROS) makes short work of big jobs. The DeWalt 5" is the most durable and longest-lived machine of its size I've found. The little 2" pneumatic detail sander is a little pricey, but pure luxury to have when working tight inside curved areas like bilge chines in hulls. I also have a buzz sander, but don't use it on boats much.

Speaking of expensive pneumatic tools, air sanders are vastly superior to electric ones, period. The price you pay - after the painful purchase - is listening to the compressor run forever. In short, they're simply more practical in larger commercial establishments than a home shop. Alas.

In all cases, I prefer to use pressure sensitive adhesive (or PSA, which means sticky-back) sanding disks that come in a roll, as seen at left in this photo, because they're way more versatile in the shop. I use 'em not only on the sander, but also to make sanding blocks, sanding sticks, non-skid pads . . . shoot, the imagination is the limit to the uses. Plus, they're way cheaper than velcro disks.


If you are scrupulous about setting planes down on their sides, backs, or whatever keeps the iron touching only good old air, your woodshop owner friend might invite you back again some day. If you set them down on the soles, as I suppose appears correct to the person who's never been tasked with keeping the blades sharp, your shop owner friend will not only cringe perceptibly if you trouble yourself to watch  for it, but will privately think about stuffing your head into the drum sander.

Fortunately, woodworkers are neither inclined towards violence nor generally rich enough to actually own a drum sander. But still, they'll think about it. So don't do it. And no, I didn't forget to say "please". Always, and I did say always, set planes down on their side, and spoke shaves on their backs. And keep a cover on the draw knife blade. Thank you.

Also note that I set my planes down on a piece of scrap wood or paper pad, instead of directly on the cast iron table saw top. You simply cannot be too kind to planes. If they are not living things, then they are something very much like it. Treat them well, and they will respond in kind.


The boat is off the strongback, and work has begun on the deck. But hark! What is that distant rumbling I hear? 

A spring monsoon springs up and dumps eight inches in less than an hour with lots of high winds and lightning. A week later another one comes along and offers eleven in one hour. A week later . . . no, I'm not making this up. But it's a real good thing I have a real shop to keep the project safe and snug, right? 


There's got to be a morning after . . . . dum de dum . . . . 


Here at The Sawdust Factory you can depend on us to "think green", and pack each picture densely with quality content to minimize wasted bytes and pixels stuffing our landfills. So, there are several things going on in this picture:

First, we have a few strips going from foredeck to aft deck that require considerable persuasion to make a nice flowing transition in the finished boat's lines. Even with heat gun helping, there is only so much you can do; so out comes the straps, a hefty chunk of cedar, and the 25 pound bag o' bird shot to help mash the strips snugly against the forms 'til the glue cures. The strap-and-weights gig, and its varying forms, comes in handy time after time.

The strips ending in mid-air over the cockpit area, where the spring clamps are, are tied with heavy packing twine to drywall screw anchors sunk into the form below to pull the strips downward, and match the "flow" of the side strips. Works perfectly. You do whatever it takes, and sometimes 'whatever it takes' can be pretty unconventional and take a little imagination.

The first four strips from the sheer line up are only 5/16" wide. There's a rather abrupt transition from vertical hull side to the horizontal flat aft deck on this design, and there's no way 3/4" strips are going to "make the turn". Well, perhaps the issue could be forced, but in any case going to narrower strips maker the job a lot easier.


Handy-dandy Tool Tip No. 382:

The Microplane, shown here with flat and curved replaceable blades. It works very effectively, cuts super smoothly, is a perfectly lovely woodworking tool in all regards, and one of the best bargains for the price imaginable. But wait - there's more! It also makes a perfect micro-grater in the kitchen; you'll find nothing better for preparing cool and lively citrus zest or buttery garlic shreds. No, really, I'm serious! And if you order now . . . . 

Update: I actually saw MicroPlanes offered for sale in the kitchen gadgets department of a major retail store recently. Yep, the exact same Microplane that woodworking stores sell. I got a good chuckle out of it.

The fencing pliers? An artifact from my forefathers, dated 1907 by Crescent Tools, as handed down to me via several generations, and reinstated by Yours Truly as a workaday tool in the shop. This baby has the pleasant habit of turning out to be the perfect tool for all sorts of odd tasks time and again; and here, proves a superb staple puller. The mass of the tool makes pulling them effortless, and the time-polished head leaves no trace of its presence behind.

So there ya have it: One of the best modern tools you can buy, and one of the handiest from the ancient past. Is this fun, or what?


Rewind to Home Page

Rewind to Page 2

Rewind to Page 3

You Are Here: Page 4

Fast Forward to Page 5

Fast Forward to Page 6

Fast Forward to Page 7

Fast Forward to Page 8

Fast Forward to Page 9