The Sawdust Factory Presents
Telescope Making
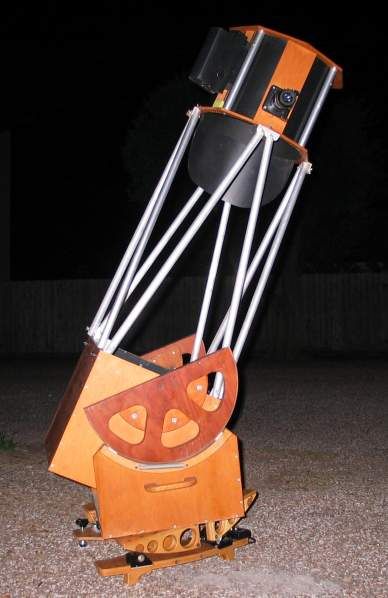
My First Homemade Telescope: a 13.1" f/4.5 Dobsonian, Built in 1992
Here it is back when it was fresh out of the oven, as seen in an old photo scanned for this article.*
Back Story: I originally bought a used red tube Coulter 13.1" f/4.5, and almost immediately began modifying it, namely to improve its motions for easier pointing and tracking, to make it easier to collimate, and to make it easier to transport in the small car I had at the time. But I quickly arrived to a point where I had done all I could do without a complete rebuild from the ground up .... so I rebuilt it from the ground up. When completed, the only thing from the original Coulter that transferred to the new scope was the primary mirror (a smaller diagonal mirror was installed in the new version).
Then a funny thing happened. I lucked into a once-in-a-lifetime mirror deal: a 13.1" f/4.5 figured by Jerry Wilkinson in Colorado. When I plugged the new mirror into this scope, the difference was immediately obvious and blew me off my observing chair. I instantly became a True Believer in Top Quality optics for life! I returned the original mirror back to the old Coulter, and it ended up complete once again. So I sold it.
Twenty-Something Years Later: I decided to post this web page to highlight the things I got right and that are still in use today, nearly twenty years later. I have been threatening to rebuild this scope for about ten or fifteen years now, but the fact of the matter is the lovely little beast works so well I just can't get in a hurry to redo it.
* Note the JMI NGC-Max digital setting circles. I bought the system ostensibly for use in light polluted skies where star hopping is nigh unto impossible. But then my batteries died one night, whereas I had no replacements on hand, and I discovered my sky navigation skills had atrophied to practically nil. I shucked the whole rig off the next day, and still have 'em yet in a box in a closet somewhere.
|
|
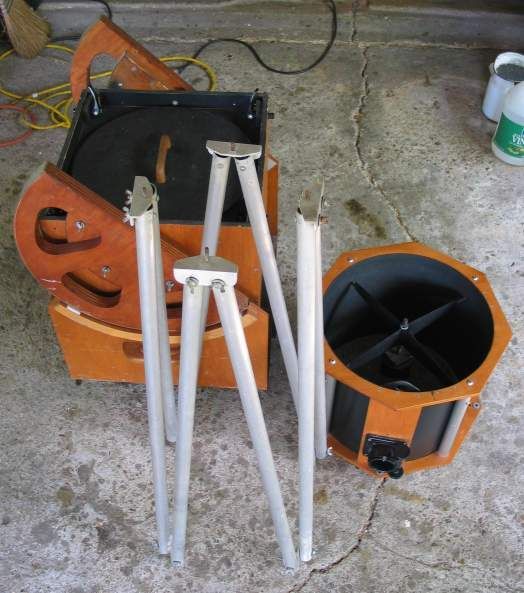
Here it is disassembled into its major component parts. The following photos were taken in August of 2011 unless otherwise noted. What I Got Right: The one-piece truss tube assembly is a winner, big time. I have no idea why I didn't stick to this scheme on the dozen or so telescopes I have built since, but you can bet your boots it'll be present on all my future ones. It works flawlessly, and the connected bundle is a zillion times easier to deal with than eight individual tubes. It was easy to make too, all of stuff from the local hardware store. What I Got Wrong: I didn't make this one a nesting design, as I did with all my following telescopes. And I've always regretted it, too. In fact, this is the only thing that makes me want to rebuild it at all. Everything else is very right on this scope; it's lightweight, isn't springy, is easy to set up and take down, very easy to collimate, holds collimation very well, has excellent "feel" in alt and az, etc., etc., etc. |
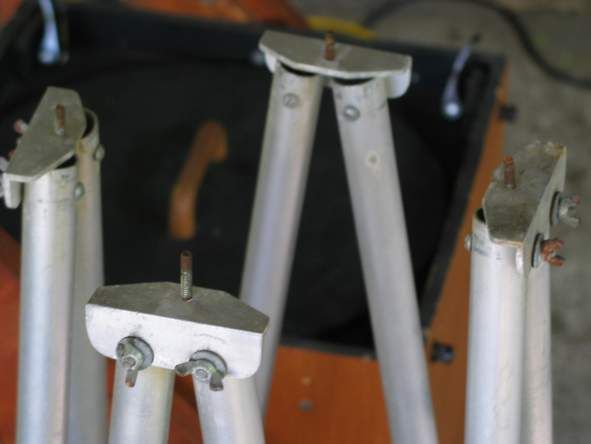 |
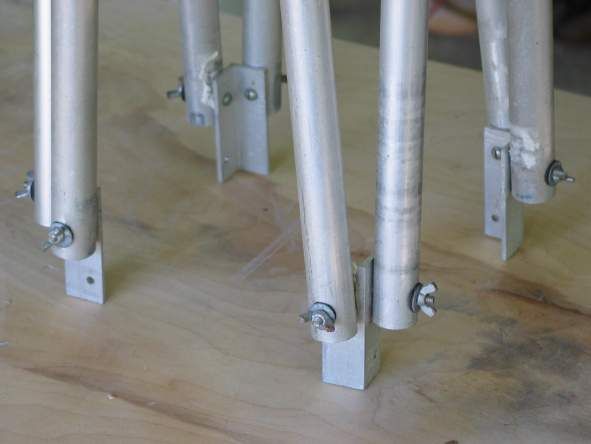
Since the one-piece truss tube assembly is the most salient, unique, and successful feature on this scope, let's talk about it in detail. What I Got Right: Using washers that have built-in rubber gaskets. They're made for tin roofing, I believe, where you can screw the sheet metal down and seal the holes in one shot. For the ATM, they provide tension on the wing nuts, so you can set the friction where you want it, and it'll more or less stay there. What I Got Wrong: I didn't use stainless steel hardware, as is readily apparent. It would've been a nice touch, and doesn't cost much extra. Seen are 1" diameter aluminum tubes, L1x1x1/8 aluminum angle, and 8-32 machine screws and wing nuts. If I were to do it again today, I'd use nylon insert lock nuts instead of wing nuts. Maybe. |
|
|
The lower end is just like the upper end, only different. |
|
Here's how the lower ends clamp to the mirror box. We're looking at 1/2" plywood; I forget what kind, but it was before I discovered the joys of Baltic birch. The bicycle quick-release clamps are readily apparent, I think. There are small compression springs from the hardware store stuffed in between the clamping block and mirror box wall, wrapped around the quick-release stud, to make the clamping blocks back off when the quick-release is toggled open. I can't believe this really works, and what's more, I truly can't believe it works so well! I mean, it seemed pretty darn half-ass even back when I first made it over twenty years ago, and I have been watching for them to fail in some way or another ever since. But guess what? They still work as well as ever today. I do not hesitate to lift the entire assembled OTA by truss poles, and these babies have never even hinted at letting go, or even shifting. They're rock-solid. |
|
|
Here's a shot showing how it works. Very simple, very secure. |
|
|
|
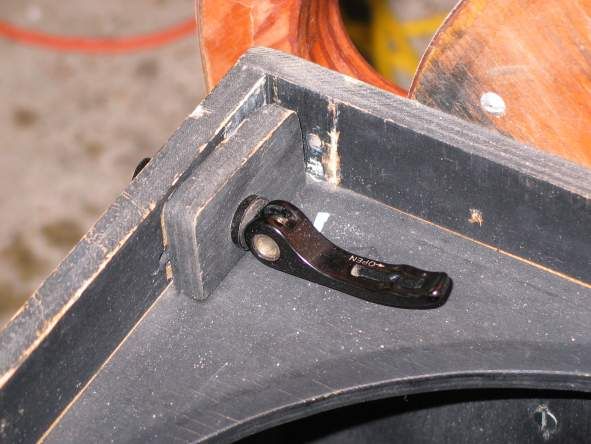
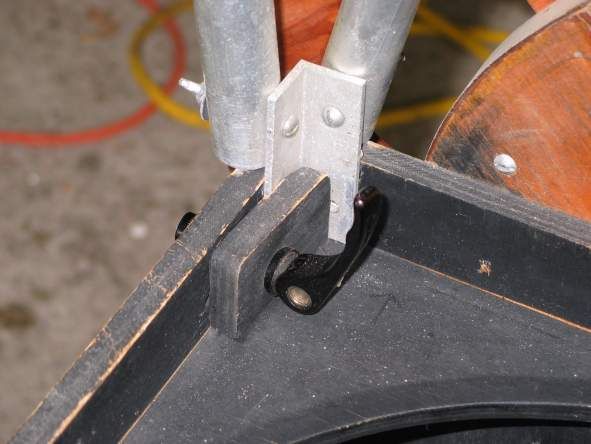
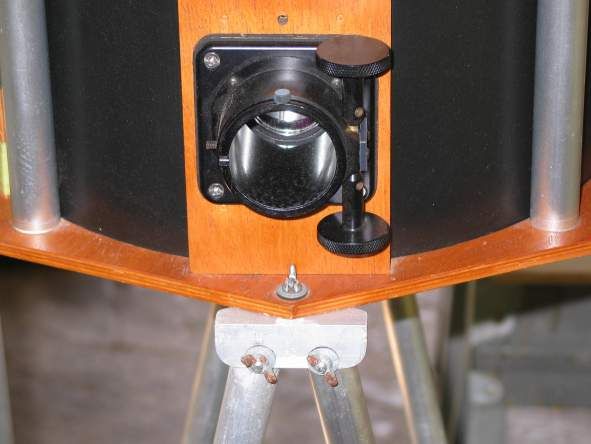
Here's how the UTA attaches, also simple and secure. And again, I can't think of any way to improve upon it, except to make something that looks slicker. Yes, that's a wing nut. Drill a hole. Done.
Oh, and super glue a washer at each hole, and that's a wrap.
That's a Tectron R&P focuser, by the way. I originally had an AstroSystems Phase IV aboard, remember those? They weren't one of the more beloved offerings from that intrepid outfit, but I liked it. But it eventually failed, and I had this Tectron unit laying around so I plugged 'er in. A good solid Dob does fine with a very simple focuser. |
Spider, secondary holder, and new diagonal mirror all came from AstroSystems too, by the way. Great company, great products for the ATM!
|
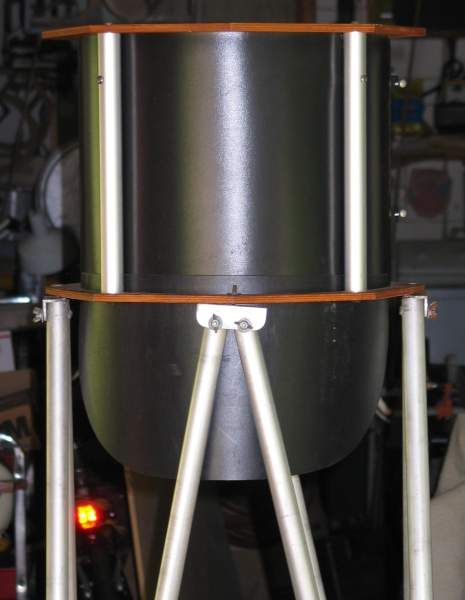
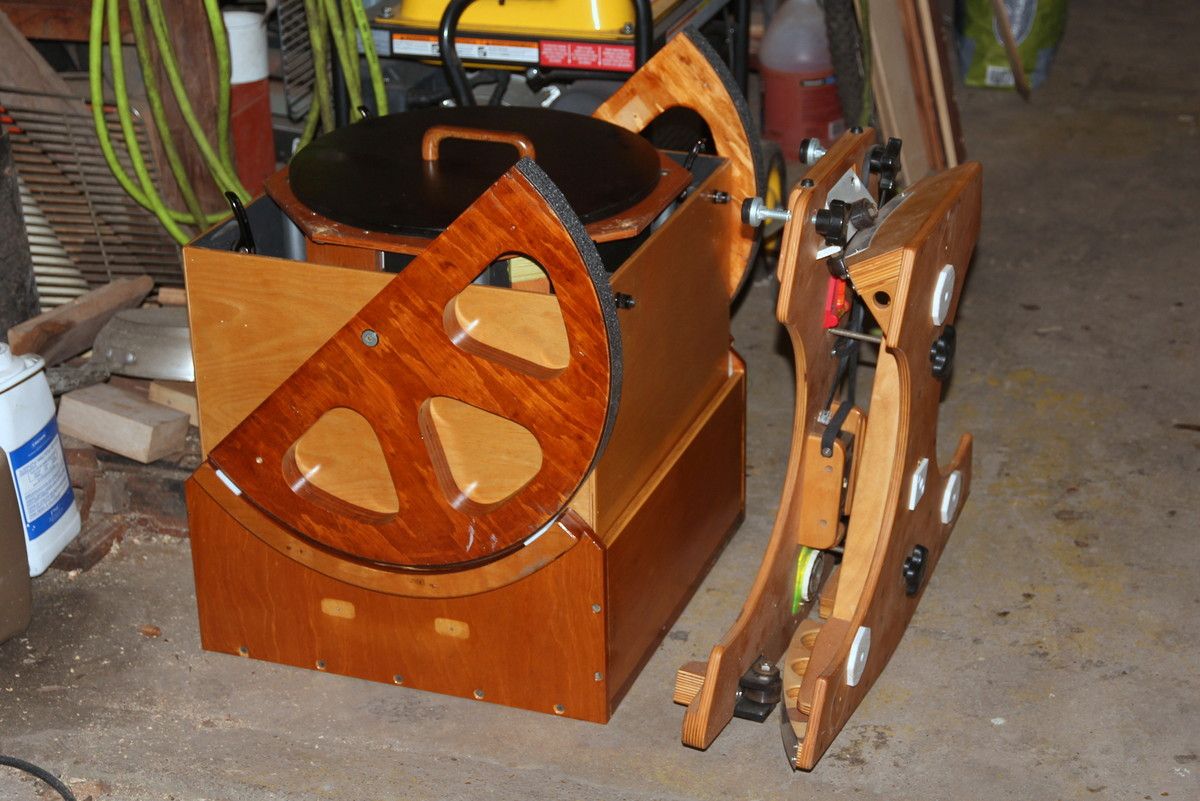
Here's something else I got right: baffling. I'm with Mel Bartels on this one, whereas there is absolutely no need for a shroud, at least as far as stray light incursion into the optical path goes. I dislike shrouds as unnecessary, ugly, and prone to wind problems. So there, pffffttt. We may talk more about proper baffling someday, but for right now I'll just point out the extra light baffle that's stowed in/on the cage, between the rings and the Kydex baffle. See next photo for the deployed position. But in the meantime, please ignore the funky appearance of the top strut attach point. It is easily finger-tip adjusted to proper fit when the the wing nut is installed, and I wish I had done so before taking this picture so it doesn't look bad. Oh well. What I Got Right: Using 3/8" plywood for the UTA rings. It worked out very well. Truss Dobs are all about low center of gravity, and a low CG starts at the top. Talk about trickle-down economics! Every ounce on the UTA is worth a pound or more to the mirror box below, for balancing. No need for 1/2" plywood up here, it would just be over-building and giving yourself grief for no reason. What I Got Wrong: Using a 12" long UTA. Could've made it shorter for lighter weight and more compact stowage. But what the heck, it's great for light baffling, and the penalty is far from horrendous. But if I do it over, I'll make it shorter. |
|
|
Please note the light baffle in its deployed position. A very simple affair, and exceedingly effective. That's the baffle right there, just below the UTA and behind the crooked upper truss attach that isn't really crooked.
Kydex can be a challenge to obtain, so where to score thin black flexy-sexy black plastic sheet? Office supply store, maybe; look for 3-ring binders meant for 12x18 documents. |
|
|
|
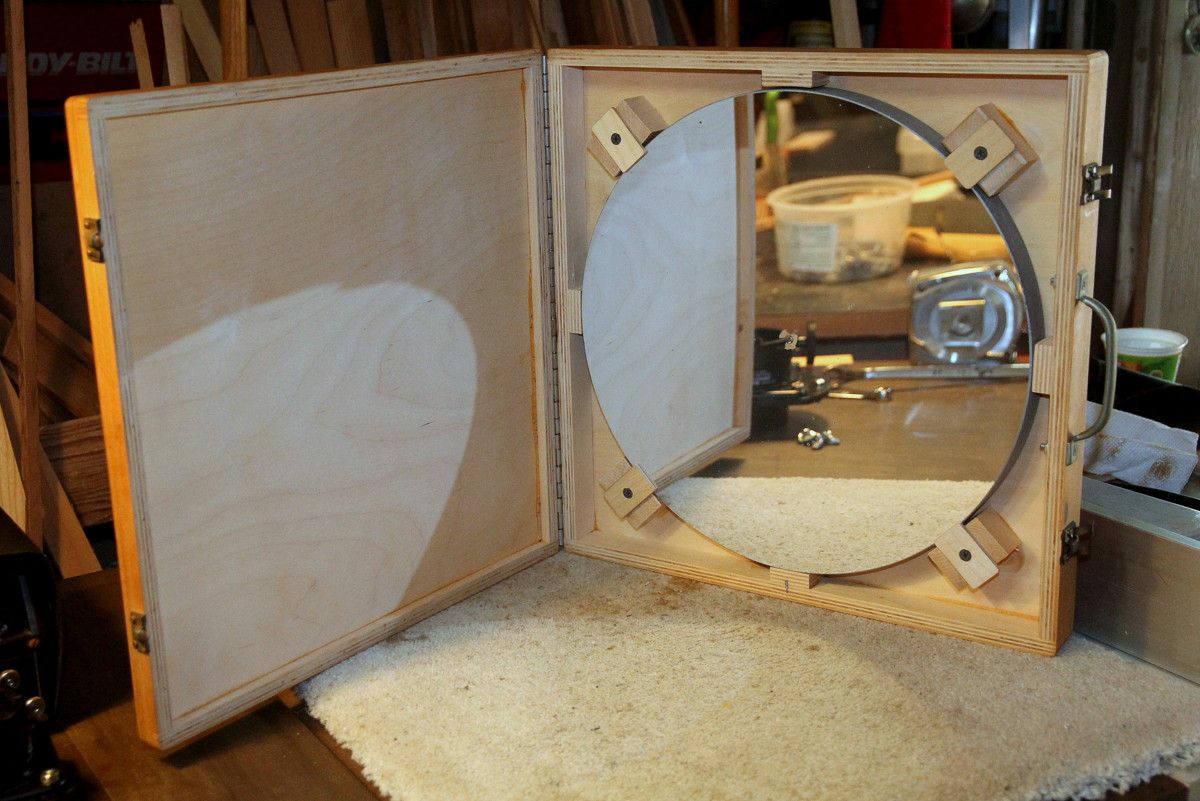
What I Got
Right: Permanent case for primary
mirror storage and transport. Except for when the scope is assembled ready
for use, the prized Wilkinson-figured 13.1" f/4.5 glass lives right
here, with the door closed.
What I Got Wrong: Not a darn thing. This is one item I got right the first time, and never had any regrets in any way, shape, or form.
It sports a 1/2" Baltic birch plywood hull, with 4 rock maple positioning blocks with 1/8" aircraft plywood hold-down tabs. The exterior is finished with Minwax spar urethane, and the interior left naked for fear of outgassing solvents damaging the coatings. No gaskets or other attempts to seal the case either. |
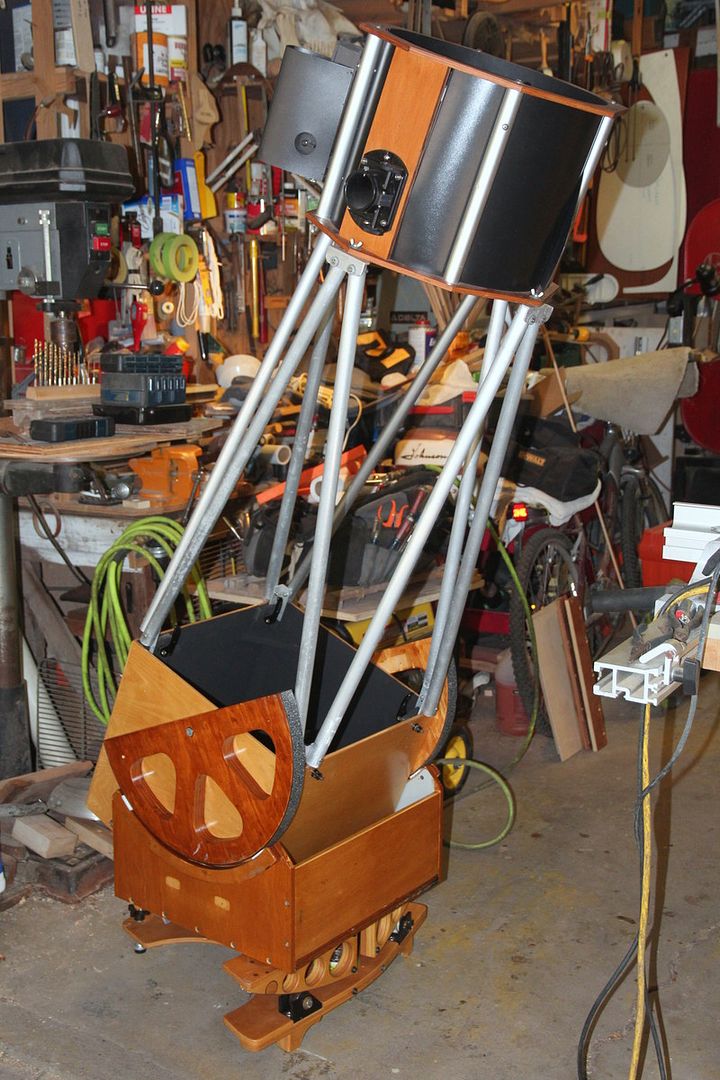
And here she is today on the Tilt-A-Whirl ride. Actually, we're trying my new Equatorial Platform (well, new in 2011, anyway) on for size. They seem to play well together!
And Now, Another Exciting Update!
Back in the first of the "What I Got Right/What I Got Wrong" segments of this article, I mentioned my failure to make this a nesting design. Well, it's September 2017, and I have finally got around to correcting the deficiency by building a new mirror box and adapting the rest of the scope to fit.
| This time I used 1/4"
aircraft grade birch plywood for the mirror box since I just happened to
have some on hand. Between the thinner plywood and minor modifications to
the UTA, the increase in mirror box outside width is minimal; it was
16.5" square, now is 17" square. I can live with that! As a
bonus, it weighs
less too.
In the second "What I Got Wrong segment above, I mention not having used stainless steel nuts 'n' bolts hardware in the truss assembly. That was also rectified at this time. |
|
| Ah yes, this is going to be much
better!
While I loved the lift handles on the rocker box, they had to go since I wish to make this travel package as compact & light weight as possible. The 3/4" doublers that increase wall thickness for the side bearings work fine for lifting. |
 |
I still want to rebuild one of my scopes, or both, as minimalist ultracompact type. One of these days, maybe. But this was a lot faster, cheaper and easier, and I have a long road trip coming up in just a couple weeks that I wanted to take this scope along on. It'll be ready in plenty of time.
Return to the Sawdust Factory Table of Contents
Email Kurt Maurer at: NGC704@aol.com