The Sawdust Factory Presents
Paddle Making
Episode Two: The "Bird's Mouth" Method for Hollow Shaft Single Blade Canoe Paddles
WARNING: The following method shown for making hollow shafts that are suitable for the construction of paddles, sailboat spars, etc., is extremely terrifyingly frightening and dreadful to contemplate. Please exercise discretion when exposing small children or more sensitive audience members to tonight's programming. Do not peruse immediately before meals or bedtime. Void where prohibited, caution urged for pregnant men and women, batteries not included, some assembly required.
|
|
No, no, no, it's not really scary, no matter what most people seem to think when they first see it. It only appears complicated and tedious until you actually try it, or see it done, and then you quickly understand that it's actually one of the simplest and quickest ways to arrive at a homemade canoe paddle of any method. Really! It's also the most economical in wood used, unbelievably strong, and super light weight . . . what's not to love? While there are higher performance paddle designs you can consider, nothing else comes close to delivering as much "bang for the buck" as this, and that's why I'm so high on it. The method is also exceedingly versatile, and a useful approach that works equally well for a variety of applications such as sailboat spars, or anything else that requires a strong, lightweight pole. Why, the possibilities are endless! Homemade brooms and mops! Wooden TV antenna poles! The coolest handle on the block for your 5-ton hydraulic floor jack! It's fairly mind-boggling!
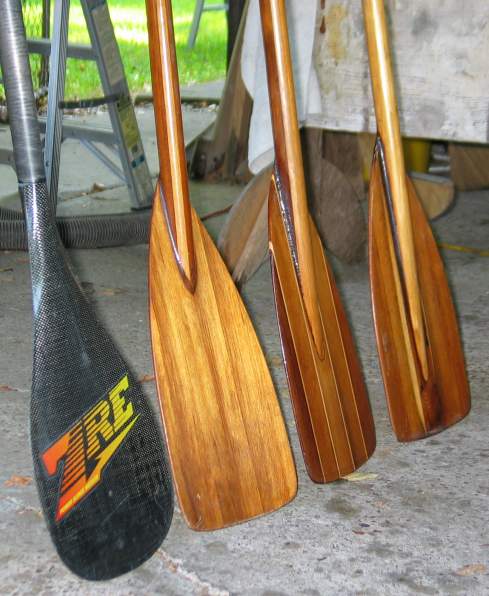
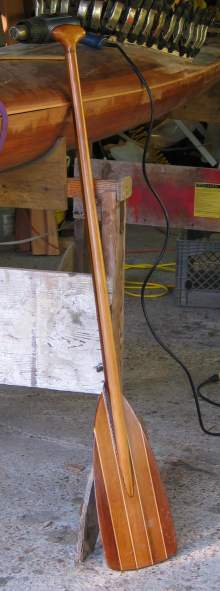
Above photos: Front- and rear-views of a typical bird's mouth hollow shaft single blade canoe paddle. For all its fancy looks, it's a very simple project, really. This 50" example weighs 13.3 ounces, which qualifies as "feather weight". Build time for me is around 8 hours, and when made in batches, probably more like 4 hours per paddle.
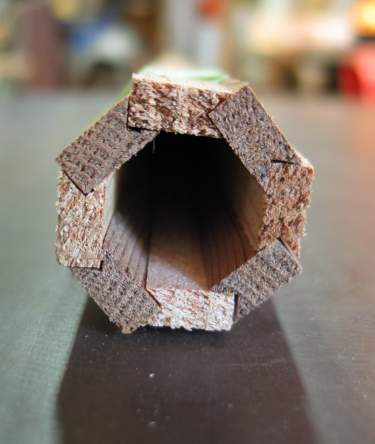 |
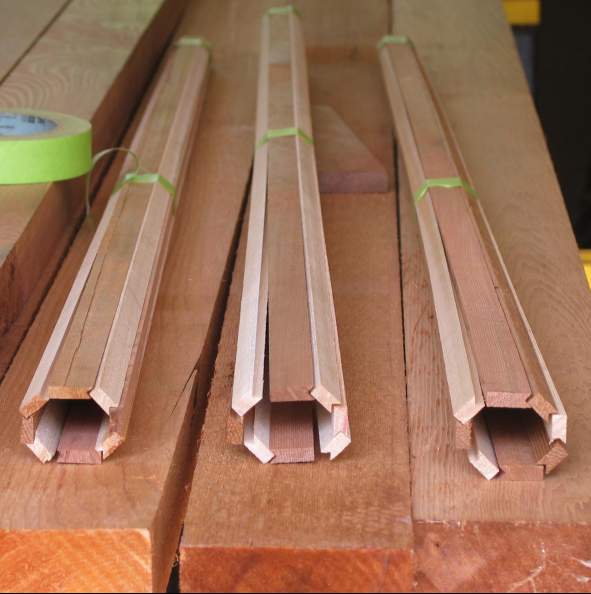
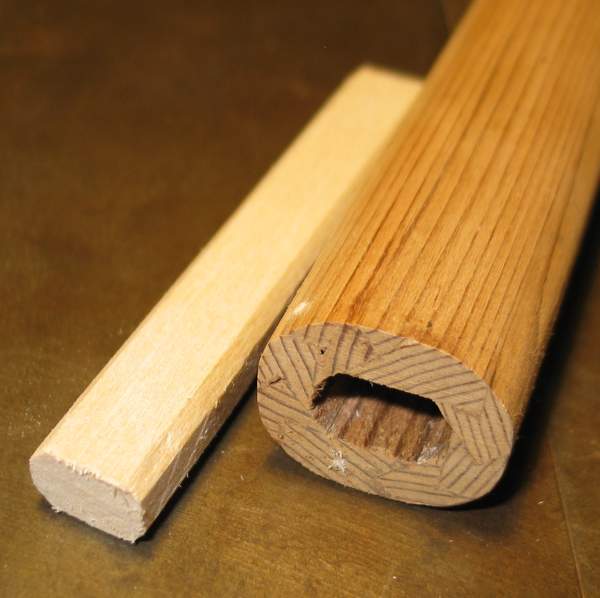
Left: How it works at a glance: here's a cross-section view of the shaft we're going to make
today. This will be a child's paddle, and will have a
round shaft. I usually make oval shafts; more on that a little later in
this broadcast.
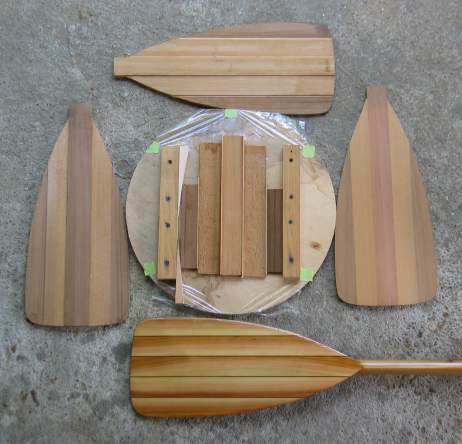
Note that it is made up of eight equally dimensioned staves, all featuring a bird's mouth milled into one edge. The wood of choice is western red cedar, for all the usual reasons; it's cheap, light weight, strong, easy to work with, good looking, readily available. And, if you choose your lumber with care, you may find contrasting colors to combine for interesting results. In this case, half the staves are of light colored cedar, and the balance of chocolate-dark cedar, which we will alternate for a "soda straw" effect. |
|
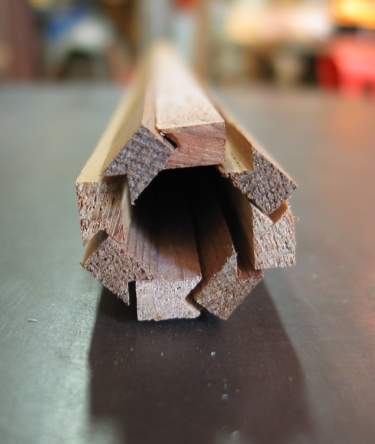
Right: An "exploded view", showing how the staves fit together. Pretty cool, eh? Cutting the bird's mouths into the parts isn't what's hard about this; gathering the staves together in your hands and trying to make them go together and form a shaft is what can be scary. Think of trying to herd cats. But it's really kind of a fun little puzzle game, although it can strike terror in your heart if you accidentally think ahead (don't do that) about gluing it all together. But never fear! A little tape, or better yet, a little tape and a pair of friendly helping hands, will render the experience pleasurable enough. Which brings us to one of the greatest points of this method: Once you get 'em all together, the bird's mouths become a self-aligning feature. Interlocking lengthwise eliminates any need for jigs, careful adjustments, etc. When they go together, they go together straight as an arrow, and it's easy to make 'em stay that way. |
 |
|
|
And why it's called "bird's mouth", in case you were struggling with that..... |
Okay, let's get started . . .
Today's guest paddle maker is a budding young woodworker who has never made a paddle before, nor, he says, completed any real project of any kind. To demonstrate how easy this is, I'm only going to talk him through it and take pictures while he does all the actual work.
|
|
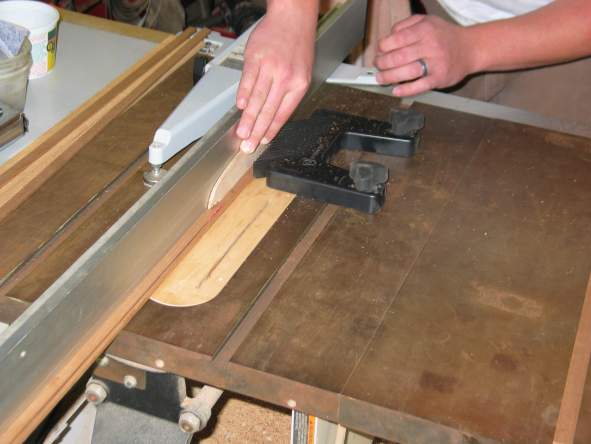
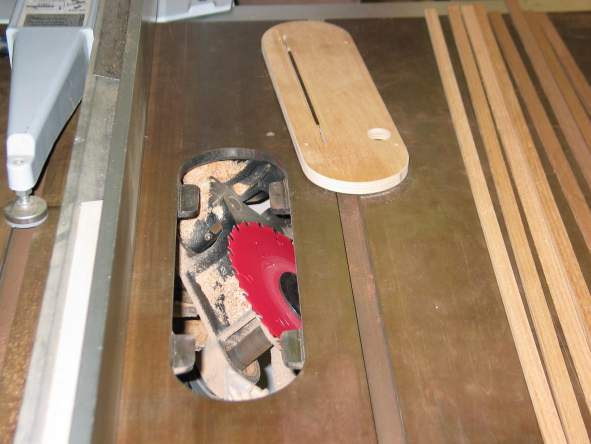
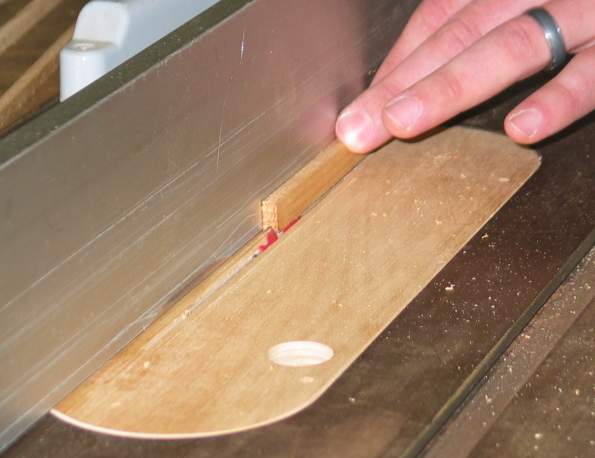
This job starts where so many do: on the table saw. Start by
ripping stave blanks. These are going to be just under 1/4" thick by
about 1/2" wide. The dimensions aren't critical, although, as always,
it helps a great deal to strive for consistency.
Almost all the staves I cut for typical canoe paddles are just under 1/4" thick, and are tapered (see below) from roughly 1/2" to whatever they end up being on the small end, usually something a little less than 3/8". Repeat: there's nothing critical about the sizes, as long as they're consistent. And they probably don't even have to be all that consistent. Whatever, this is easy and fun enough to experiment with using short pieces to keep it easy and conserve wood.
Note the use of a push stick made of very thin plywood. |
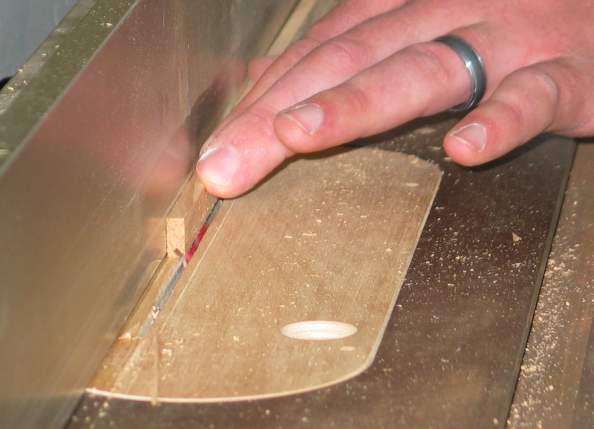
| Then we mill the bird's mouth. It's a simple enough process,
whereby you tilt the blade to 45 degrees, and let 'er rip. Get it?
Rip? Heh, a little wood shop humor there . . .
If there's any trick to this process, it's the use of a zero-clearance insert on the table saw throat. But I'm a big believer in using zero-clearance inserts at all times anyway, and in my opinion, they ought to be standard safety features all woodworkers use routinely.
So, once again, please note the shop-made zero-clearance insert for the table saw. You can buy 'em ready-made too, but they're really easy to make at home. This 45-degree one is made from a scrap of 1/2" Baltic birch plywood and four set screws from the hardware store for leveling. I make individual inserts to fit blade angles I commonly use, and only pull out the factory made one with the wider opening when tilting to an odd angle. |
 |
Another recurring theme around here is my blade of choice: the 7 1/4" Freud Diablo 24-tooth carbide rip blade from the local Ace Hardware for twelve bucks or so. Smaller blades run smoother on 10-inch table saws, and the thin 1/16" kerf minimizes waste. Although I mostly work with softer species of woods including cedar, redwood, basswood, I also have the occasional maple, mahogany, walnut pieces come through, and the Diablo seems to handle all equally well.
|
|
It can seem a little tedious to fiddle
and fuss with getting just the
right blade height and fence distance worked out. But take your time and
get it right, for thy patience shall be amply rewarded. Once you get it dialed in, the following work is
fast, easy and
lots of fun! Do test cuts on pieces of scrap before starting on the staves.
Tip: It's never a bad idea to make an extra stave or two just in case of . . . well, you know. Cedar's cheap.
And now we're ready to go. Pass number one cuts the first half of the birds mouth . . . |
|
Then flip the blank end-for-end and make pass number two . . . |
 |
Note that no push stick is seen in these scenes. Such is testimony to the overall friendliness of this method. You would actually have to try hard to bring harm to your fingers with so little blade exposed.
|
|
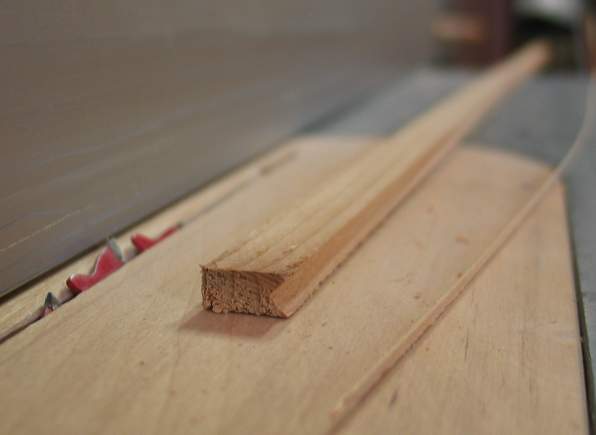
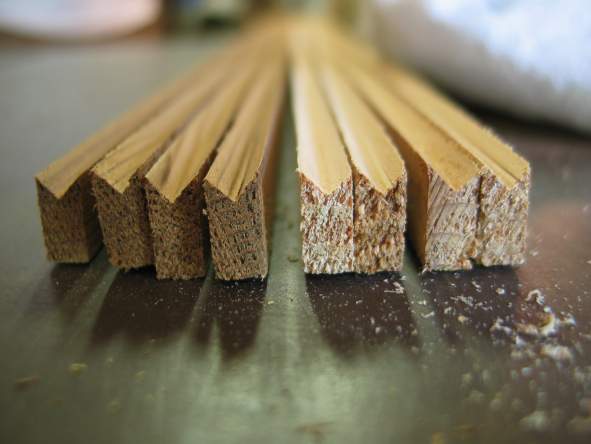
. . . And there ya go!
The result of the second cut should be an accurate bird's mouth in one edge of each stave. You know you're really on to something when the waste comes out as a gossamer thread of wood, as seen here. |
|
Repeat as necessary to arrive at eight bird's mouthed staves. |
 |
|
|
Next, we're tapering the staves using a simple shop-made
taper jig for the table saw.
This step is optional, but a tapered shaft really elevates the level of satisfaction and pride you can take in your end product by giving it an unmistakable element of grace. I normally taper the staves before milling the bird's mouths, but in this case we forgot. But as you see, it's a friendly process, and no problem to do this step after tapering . . . just don't cut the wrong side.
Taper jigs are super simple affairs, and adjustable ones are commonly sold by woodworking tool emporiums and purveyors for twenty bucks or so; but the store bought variety is way too short for this, so we just make our own as needed out of scrap. Takes little time or effort, the hardest part is hunting up suitable scrap pieces.
|
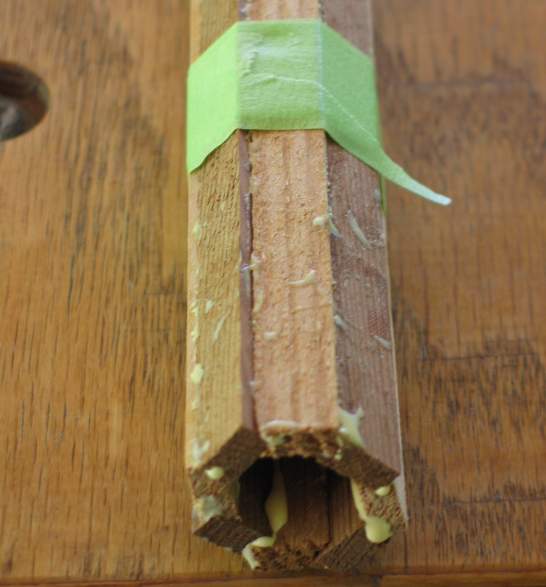
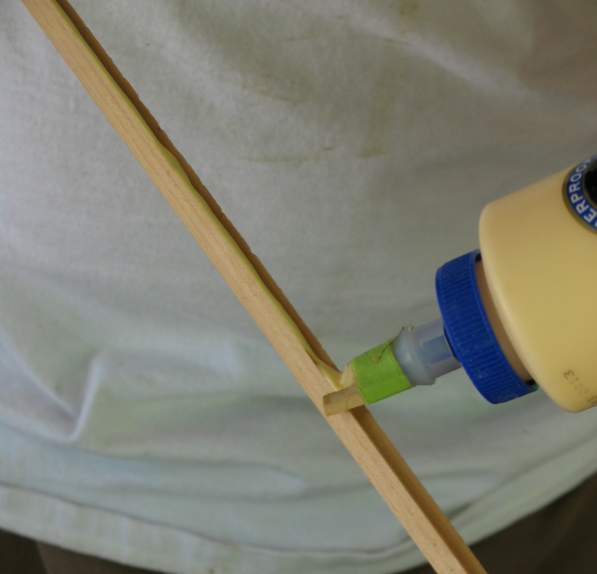
| When you're done with the scary whirling carbide machine thing,
it's time to make the big gooey mess. We're using my favorite glue here:
Titebond II. Note the bit of wood taped to the spout for a guide.
If you feel epoxy would be better, and are more comfortable using it, then by all means use epoxy. I choose to use Titebond II because it's cheaper, lighter, easier to clean up, easier to sand, etc., etc., etc. And it has never, ever let me down in any way, shape or form. |
 |
|
|
Glue those babies up and "clamp" 'em together with bands of
tape.
I recommend tape that has some stretch to it for this sorta thing, like 3M brand green lacquer tape. It's the perfect thing for the ol' wood shop, find it at auto or house paint specialty stores. Big Box won't have it. Electrical tape would be my second choice. If you can make a non-stretchy tape work, like ordinary masking tape or blue painter's tape, good for you.
Anyway, the entire operation you have seen so far took about an hour. |
| Here's a paddle shaft I made a while back, all rounded off and nicely shaped. Note that it's an oval cross section. Making oval shafts is as easy as ripping two of the stave blanks slightly wider than the others, and positioning them opposite each other. | 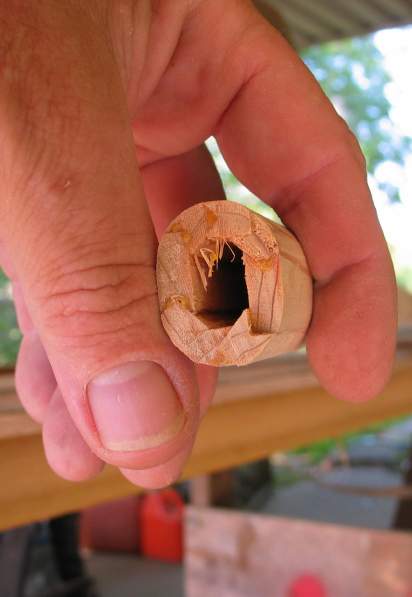 |
|
|
And here's a picture from another batch of oval cross section
paddle shafts. I prefer the oval shafts because I believe they're stronger
than round ones (long axis oriented fore-and-aft), look fancier, and feel more comfortable
in the hand. Not
a bad bargain considering how very little extra effort they require.
Note the contrasting wood colors; again, it's all carefully chosen western red cedar. No, that's not a split in the stave at left; it's just a grain feature. |
|
|
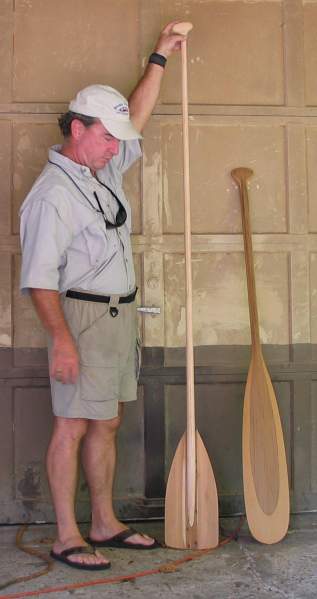
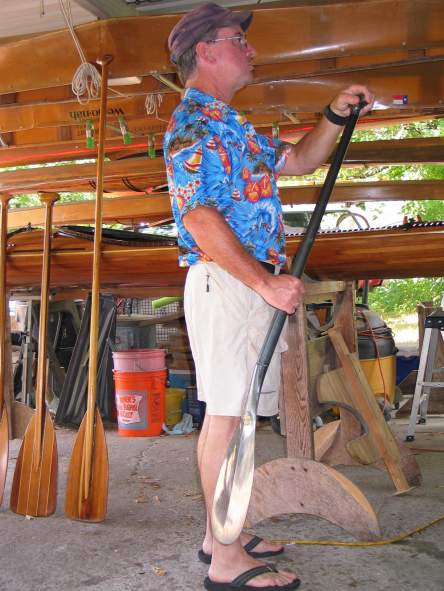
Here are a couple more pics to ponder. At left is a 72" paddle I use as a combination long paddle and push-pole for standing in my canoe (see photo at right). At 18 ounces, it feels as light, or lighter, than any stand-up paddle board paddle I've handled yet, and it's at least as strong, if not stronger. I actually try to break these things in order to discover stress points, and so far it hasn't happened. Okay, maybe I don't try all that hard to break 'em, but I certainly don't go easy on them. The other paddle in the photo at left is a traditional beavertail, made in the classic style: out of solid wood. But although it's light weight cedar, it still comes in at 29 ounces. Ugh. Anyone can build a wood paddle that looks cool. That's easy. But it takes a little doin' to make a wood paddle that looks nice, is robust enough for routine use, and is delightfully lightweight. |
This paddle has been in service since 2007, and still going strong. |
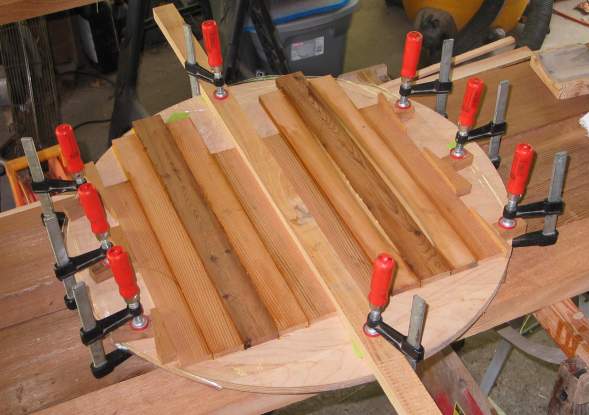
| Here's a good method for making paddle blades.
First, figure out what blade shape and size you want. Here, I've basically copied a Grey Owl blade from a friend's bent shaft model because it happened to be laying around when I wanted a blade shape. Make a half-pattern out of thin "doorskin" plywood. I always use half-patterns on boat stuff to assure symmetry, and get a little flexibility in the shape and width I'm after. Rip a few suitable pieces of cedar as show, we'll talk about thickness in a minute. Then get a piece of flat scrap plywood, MDF, whatever, to act as a clamping base, add plastic wrap or wax paper to prevent glue from sticking to it. Screw or clamp a block of scrap to act as a stop fence, do the same again leaving room for your blade strips plus a little extra (or use clamps instead of screws on the second fence for flexibility if making several different blades). Add blade pieces. Use wedges to apply the clamping pressure. Trim to final shape afterwards. The blade in the clamps at right is going to be a small one for the child's paddle we're making. |
 |
|
|
With this method you can gang your blanks and really go into
production. Here, I've got two blades curing; but you could easily use a
pine 1x12 and make any number of blades simultaneously. Place weights on top of the
blanks to keep 'em flat if they want to bow up. In case you're wondering, there are lots of circular pieces of scrap plywood laying around here at the Sawdust Factory because of an old telescope making addiction that just won't go away. |
| About blade thickness . . .
I have found it works best to use thicker wood in the center, and gradually thin out towards the edges. Photo at right shows the progression if you look closely. The blank at bottom is freshly glued up and still in the rough. The blank in the middle is partially planed, and the top one has been planed and sanded. The wood is 1/2" thick in the center, steps down to 3/8", then to 5/16" or 1/4" at the edges. As for the edges, I leave the thicker center as is for paddles that'll get used as push poles, for strength. Regular paddling paddles get planed and sanded to maintain a constant edge thickness across the bottom edge. Blade shape, size, edge treatment, etc., is wide open . . . use your own imagination. I make no claims to having any sage expertise. To tell the truth, the single blade paddle I like using most is a medium weight Zaveral Power Surge, which is awfully hard to beat. But it's well over $200, too. These are more like $20, tops. Some assembly required.
|
 |
|
|
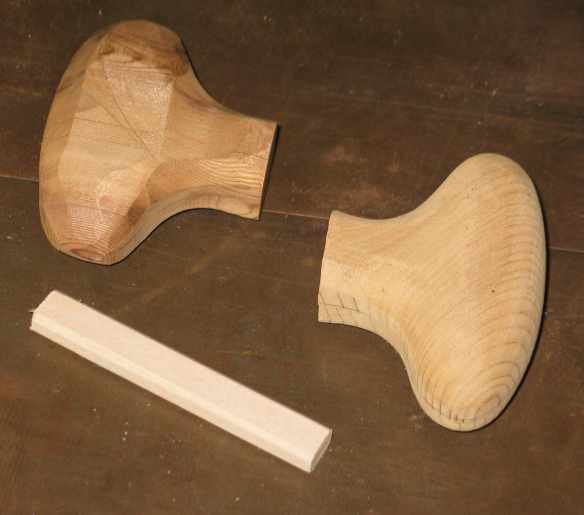
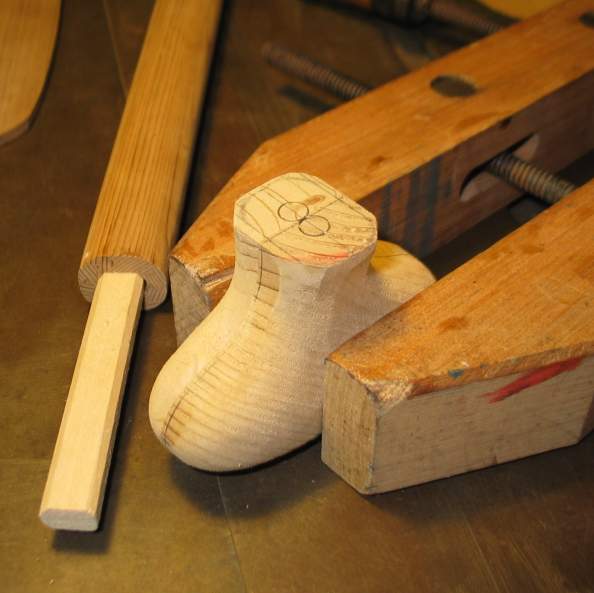
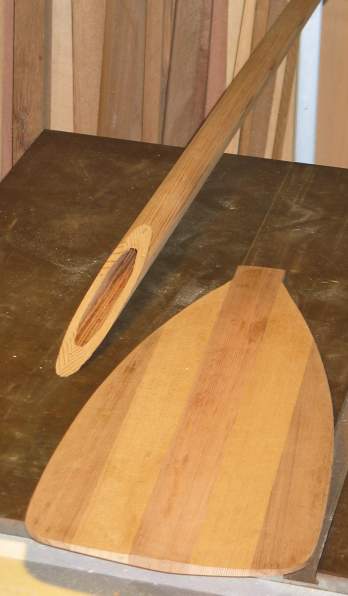
The handles are made just how they look like they're made:
carved from blocks. But yes, you're right, there are
tricks, as always. Click HERE
(scroll down to the bottom), and also HERE
for hints and tips on how to get good results.
Start by determining the shape you want, and if unsure, just find a canoe paddle you like and trace the grip on a piece of paper. Cut out, or building up, a blank of the appropriate dimensions. On the blank, draw the shape in three views - front, side, top - and cut 'em out on the bandsaw. Then carve and sand off everything that doesn't look like a graceful sexy curve. Nuthin' to it.
The little white stick at bottom is the plug we make to stuff in the end of the paddle shaft, and into the hole we make in the bottom of the grip, for a strong connection. Grips popping off are a no-no, mustn't have it. This plug is long enough for two paddles. |
| While I'm working on getting pictures of
actual attaching-blade-to-shaft ops, let's address a question I often
hear:
At what angle should I attach the blade to the shaft, and why?
First of all, bent shaft canoe paddles were developed by racers, the idea is to keep the blade closer to vertical while the shaft, or loom, is slanted in mid-stroke. In the photo at right, our lovely model poses with the paddle held frozen in the very middle of a normal forward stroke while pretending he's seated in a canoe. See how the blade is being presented? Now you know.
Want more? Here ya go, straight from a pretty reliable source.
Incidentally, everyone who picks up a bent shaft paddle for the first time just naturally assumes it goes the other way, and holds it backwards. Don't tell me you didn't, I know better. I did it too. And if you ever make fun of anyone who does it, you will instantly forfeit every karma point you ever accrued. |
 |
|
|
And here's how it translates to our
bird's-mouth paddles. The short of it is that you may attach the blade at
any angle you prefer.
If anyone figures out how to make a straight-shaft paddle using this method, I hope you'll drop me a note showing how you managed it....
From left to right: A Zaveral medium Power Surge, the standard of the Texas racing community, showing the 12-degree angle for comparison. Next, a bird's-mouth paddle sporting a bit more angle, 14 degrees, to experiment with. Then a general-use example with less bend, and finally a stand-up push-pole-paddle with minimal bend.
While it's pretty obvious that those with less bend have more gluing surface, and therefore are presumably stronger, it might also be noted that I have yet to break ANY of these paddles. I don't go out of my way to try to bust 'em over stumps, but I have been known to use 'em extra hard specifically to see how they hold up. So far, not a hint of failure.
Once again, this method results in remarkably strong paddles that have a very pleasing and solid feel, yet are delightfully lightweight, and surprisingly easy to make. |
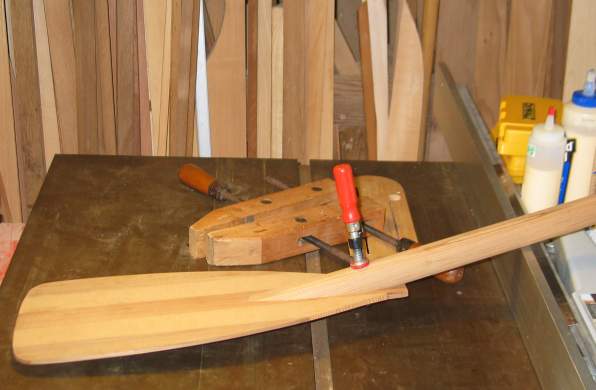
| Finally, let's talk about joining
the loom to blade.
Nothing scientific about it, just cut the shaft at an angle, make the sloped part as flat as you can get it, and then glue the two pieces together. A good way to get the slope flat is to lay a piece of coarse sandpaper on something flat, then holding the shaft as accurately oriented as you can by eye, swirl it around or saw back and forth on the sandpaper 'til it's nice and flat. An even easier way is to do more or less the same thing on a stationary belt sander. If you get the slope perfect, wood glue will work for this joint. If not, that's what thickened epoxy is for. Either way, you're working with a lot of end grain here, so be prepared for some serious sponge action. That means use ample wood glue, or generously pre-soak with unthickened epoxy before gluing with thickened epoxy. One face of this blade is a shapely dihedral, the other flat. Glue the flat face to the shaft. It'll not only be easier to bond that way, but will also make the dihedral work on the power face as intended. After gluing, I come back and add thickened epoxy fillets to the shaft/blade joint because it just seems so right. I mean, it looks right, it feels right, so it must be the right thing to do. Right?
|
 |
| Finding a good way to clamp isn't always
easy, so just play around with what
you have and discover what works best for you. If you use wood glue, you
need to figure a way to bring decent
pressure to bear that'll stay put for 24 hours if you want it to work
right. If you use epoxy, then
pressure isn't the big deal -- just making everything stay in position at
least until the goo kicks will do.
Maintain alignment by eye, and check often. If you end up with a crooked blade-to-loom connection, the best advice I can give is to stay calm, and act like you meant to do it; then go out and develop a new and exciting paddling technique, and become rich and famous for it. |
 |
|
|
Next, how to attach the grip.
This is tons easier than it appears ..... in fact, it's so simple you're going to feel ashamed of yourself for glancing at the picture and thinking "oh yeah right, like I'm some sort of professional woodworker like this guy here...."
Simply rip a piece of wood to the width and thickness of the inside of your shaft, then chamfer the corners off with a plane. Doesn't even have to be a sharp plane, a dull one will work fine here. There now, was I right or what? |
| Here's the plug as it looks plugged in.
If you look closely, you'll see a gap where the fit isn't precise. No
sweat, again, that's what thickened epoxy is for.
Now, all this talk about filling gaps with thickened epoxy doesn't really mean you have to feel like America is a free country and you can just go nuts or anything. The better the fit, the stronger the joint, is still as valid as ever. Freedom doesn't mean you can do anything you want to do; it means you can do everything you should do. So keep striving to make fit-ups accurate! Now, if you're thinking that making an elongated-octagon-shaped mortise in the T-grip handle is going to be really hard, well, you're right. That's the bad news. The good news is that we never do things the hard way here at the Sawdust Factory. So the above paragraph notwithstanding, we are going to rely on thickened epoxy to save our butts once again. Drill a couple holes to get started, and then dig out a mortise as best you can manage with a small chisel, box knife, Dremel tool, or just whatever you have that works. At least try to keep it tight, and you'll be fine. Keep working the hole until the plug will go in, and when you got it, thickened epoxy will do the rest. Make the plug at least two inches long, so that you have one inch inside the shaft and one inch inside the handle. Any more than that won't add strength, and any less will decrease it. I use green tape to hold the grip in position for 24 hours. Be sure to eyeball-align the grip accurately, then re-check after it's all taped up and ready to cure. Then check it again. Then one more time, just to be really sure. If you think this is tedious, just try developing a brand new paddling technique based on a boo-boo. |
|
|
Use a clamp to secure the grip for drilling and mortising. |
Note the grain direction of the grip in the photo above; it's going diagonally. I strongly recommend that you try to avoid having all the grain going vertically or horizontally, because sooner or later you're going to whack it on something and a great big chunk of handle is going to break right off. Yeah, go ahead, just ask me how I know. Making a laminated blank similar to the beavertail paddle is by far the best way to go, with the grain direction being mixed up. Next best is to orient it 45 degrees.
On to Page 2 where we get exciting reader feedback!
Other Bird's Mouth Web Articles:
A
Hollow Round Mast
Using the Bird's Mouth Method
From My Friends At Duckworks Magazine
Return to the Sawdust Factory Table of Contents
Email Kurt Maurer at NGC704@aol.com