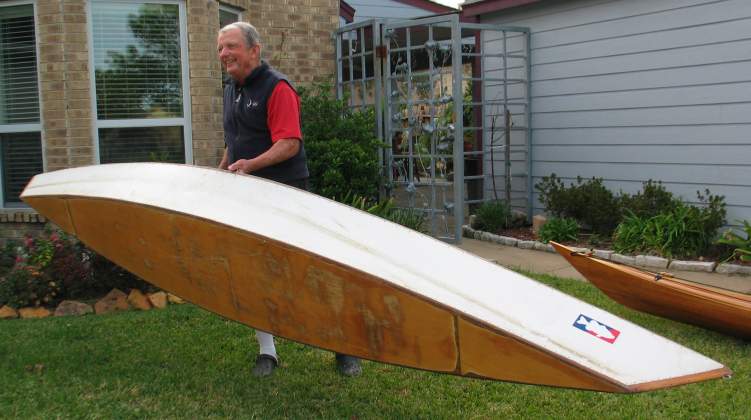
Above: The Man and His Boat in a breathtaking blur of action. Note the steely gaze --- this is clearly a guy who means business!
The Sawdust Factory Presents:
~As Original As It Gets~
A Simple Home Built 14-footer. . .
. . .That Weighs 17 POUNDS!!
A couple years ago I was paddling Horsepen Bayou, one of my regular haunts, when I ran across this guy fishing out of a boat that really got my attention. I had never seen anything like it! I stopped to inquire, and fortunately for all of us the man in it turned out to be a very agreeable sort. I have the honor to say we became friends, and he has agreed to share his amazingly simple ultra light weight boat building techniques with the world. Herb Cottle, of Friendswood, Texas, is his name.
I am pretty familiar with most of construction techniques we modern epoxy-slingers use, stuff like strip-building, stitch-and-glue (S&G), skin-on-frame (SOF) foam core composite, vacuum-formed lay-up, plus whatever else I'm forgetting. But this beats everything I have ever seen for all the features I wish I were smart enough to think up myself: "outside-the-box" originality; uncomplicated, straightforward simplicity; pretty darn decent economy; and a strength-to-weight ratio that would make an aircraft builder sit up and take notice. What knocks me out most about these boats is that the feather weight comes with such a remarkably low penalty. I would have expected a delicate boat, but it simply is not the case.
All the neato info included herein offered is 100% free for the taking; the only catch is that you are expected to already know the basics of S&G boat building. We welcome email with comments and questions, but please, no queries like "what is fiberglass?" Assuming one has done the homework and attained a good idea of what "S&G" means, this should be nothing a beginner can't handle.
You're likewise on your own as far as plans go; this site offers only a method, no specific design. The good news is that this method of building will work with just about any old three-panel pirogue type boat, and ought to work fine for four panel Vee-bottom designs also. You are encouraged to use your imagination.
And don't even think about suing anybody if you cut your fingers off or drown yourself. If you cannot manage to keep yourself healthy and in one piece during the course of pursuing a hobby, it sure as heck ain't our fault. We expect you to be fully aware that things like saws and deep water can be dangerous. Okay? Good....
|
|
|
Above: The Man and His Boat in a breathtaking blur of action. Note the steely gaze --- this is clearly a guy who means business! |
Jim Yarbrough, of Deer Park, Texas shot the above photo after having an experience very similar to mine, and became the catalyst for this web offering being brought to you today. You owe him a beer.
|
|
|
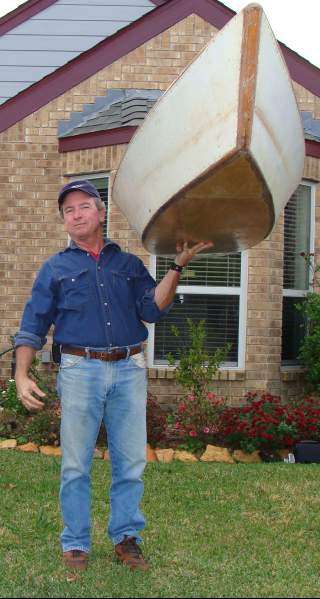
Herb is a retired aerospace engineer on the NASA Shuttle program, who says "optimizing the design and construction of boats, airplanes, and fishing lures has been a long-time goal of mine." Above, we see him wearing a much more typical expression on his mug as he hefts his 14' x 30" boat with one hand. |
|
|
Left: Another photo emphasizing the feather weight of this 14-foot boat. Yes, that's me hamming it up for the camera, and yes, the entire boat is resting only on my fingertips. |
So howzit built? The short answer is: very simply. Seriously, there are no fancy tricks or exotic materials here; just normal wood shop skills, and materials that are easily found by anyone who knows what Google is. Heck, Jim says the Trim Coil can be had at Lowe's. Trim Coil? Keep reading. . .
|
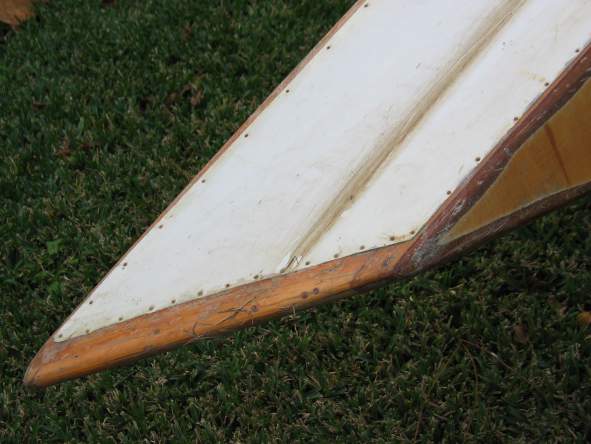
Basic Description: Two cedar side frames are covered with Aluminum Trim Coil, a pre-painted sheet metal building roll product that make me think of flashing, and a 1/4" plywood bottom. That's it! I had never heard of "trim coil", so I ran it past a roofing contractor friend, who wrote back: ".... coil metal, like we use to do trim on houses. I had never looked at the coil as boat building materials." Epoxy is used to encapsulate all wood for
waterproofing, and fiberglass cloth is used in strategic areas to impart
lightweight structural reinforcing. Herb says "You do not fiberglass
the bottom. The first coat of epoxy is squeegeed on so as to get maximal
absorption. I sanded this then put on another coat and used an old
sock on my hand to smooth out the epoxy. Construction procedure is very similar the building of any pirogue, "cheap canoe", "6 hour canoe", three-panel design, etc. -- they're all essentially the same thing; the simplest of boat designs featuring one flat bottom and two flat sides. The sides are built to the desired shape, joined at the ends, spread apart in the middle to desired width, and a bottom added. The rake of the stems go a long way in determining the side flare, and flaring the sides adds to the stability of the boat. Think of the two sides as ladders, where you have two long side rails, or stringers, and a bunch of rungs between. Lay the two ladders on edge side by side and lash the ends together. Now spread the two center sections apart and voila! a boat shape is made. Now cap it off with a sheet of plywood, trim excess, and a boat is born. Get it? |
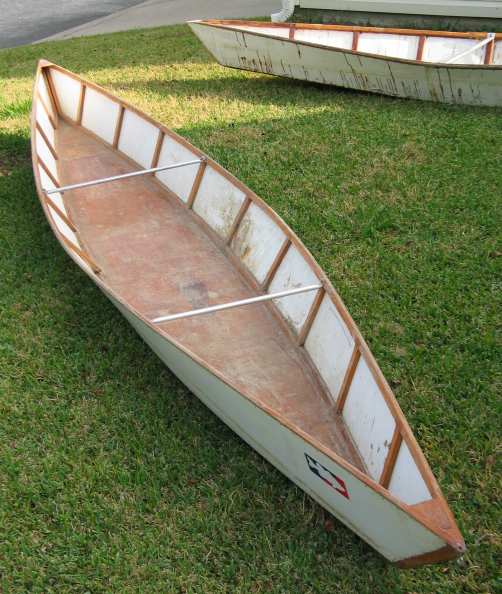 |
| Jim writes in an email: "Went to Home Depot on Saturday and sure enough they still had the partial roll of trim coil. I figgered it looked like about 30’ which would have been perfect. But alas, it was only 26’ which means I either build 2-13 ft’ers or 1- 14 ft’er and a 12. Anyway, I have some and I was surprised by how thick it was, not as thin as I thought. Very rugged stuff. I can see why your boats have held up so good, Herb. So I got the trim coil and paid $37.50 + tax. The manager would not cut me any slack on the price for a short roll nor the fact that one end wasn’t real smooth. Oh well, I’ll find a use for it." | Above: The boat in the background was built about twenty years ago, was one of his first two-man boats, or, as we call 'em in canoe lingo, a tandem. He had originally sold the boat to a friend, then more recently bought it back when the friend moved away. |
Here are more details, given in Herb's own words:
"I have built about 30 of these boats over the
past 30 years. The first one was a 14 footer the same size as the one
pictured. The side frames were made from 1" x 2" pine stringers,
and each panel in each side was covered individually with aluminum flashing and
tacked on with 5/8" wire nails and epoxied. Shortly after that first
boat was built, two friends and I built three 16' boats because I and one of the
guys wanted a two-man and the other guy (a 350 pounder) wanted a 16' one-man.
I have tried to make improvements in each, and have not been totally happy with
them until the last two made within the past two years.
"The pictured boat was made right after Hurricane Ike, from four cedar
fence pickets and a sheet of 1/4" plywood. After the sides were completed,
they were bent around a temporary wood "former" that was attached to
the center section of each side with sheet rock screws. Then the
ends were epoxied and screwed together with sheet rock screws. The screws
were removed after the epoxy cured. The temporary former stayed in place
until after the bottom was attached."
|
|
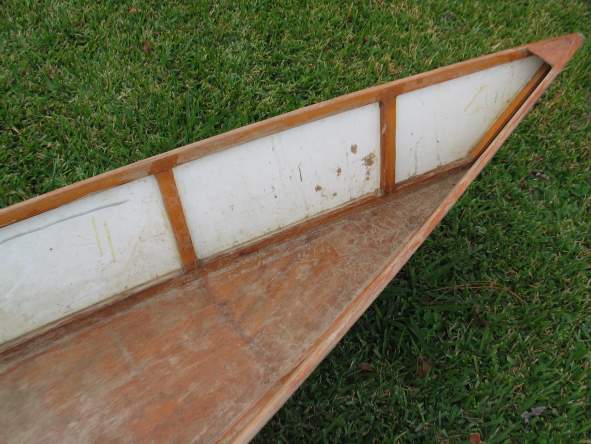
Here we see another view that pretty
much sums up all there is to know about this construction scheme. The trim
coil sides are attached to the wooden frames with tacks and epoxy.
The side panels are built on a flat surface, just like
"stick-and-tissue" model airplane fuselage halves used to be.
When the sides are bowed, the sheet metal tightens up like a drum and becomes quite
rigid. There is practically no "aluminum boat noise" made by the
finished craft; it is silent as an all-wood example.
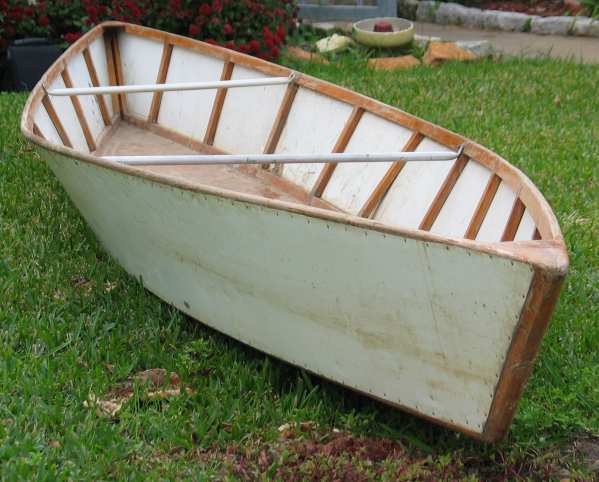
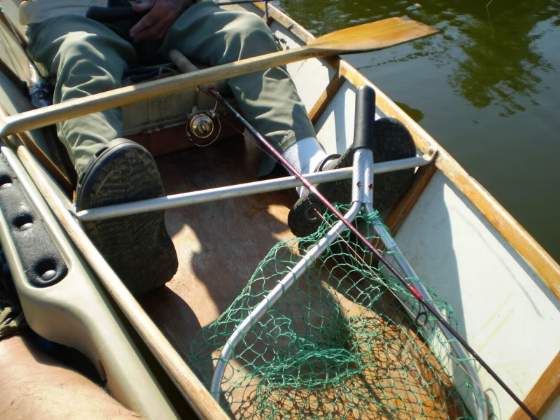
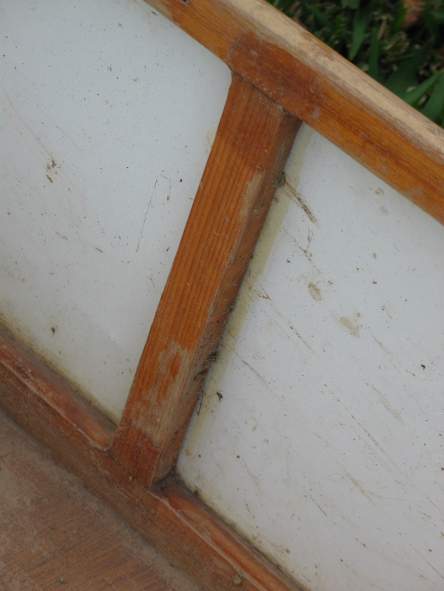
Thwarts or decks, your choice. One or the other is necessary to to impart rigidity to the hull; thwarts are lighter. Traditional pirogues are internally braced with rib-like bracing structures. In any case, you'll have a mighty floppy boat if you don't stiffen it up with something. These thwarts are aluminum tubing scavenged from retired lawn chairs or some such. If you look carefully, one of the "ladder rungs" has sprung, and is showing daylight between wood and aluminum. No big deal! Don't let the ultra light weight fool you; this building method features appreciable safety margins for structural integrity. Herb will fix it one of these days . . . when he feels like puttering around the shop instead of going fishing. But until then, the basic strength of the hull has not been compromised anywhere near enough to get excited about, and she is plenty good to go just as she sits. |
Oh yes, one of these days maybe we'll have to put together a feature detailing Herb's home made fishing lures . . .
| Right: A bit of a bird's eye view showing the
side frames coming together, with the hull bottom beneath. I believe this structure qualifies as "monocoque", or at least "semi-monocoque", since the aluminum skin carries a significant portion of the loading borne by the side panels. |
 |
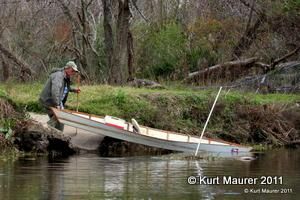
Herb is embarrassed about all the mud on his boat. I thought about suggesting we hose 'er down for these pics, but finally decided it just plain looks better the way it is. I mean, this boat gets used a LOT, and I can't think of a better way to express it. Yes, it's covered in mud! Isn't it beautiful?
|
|
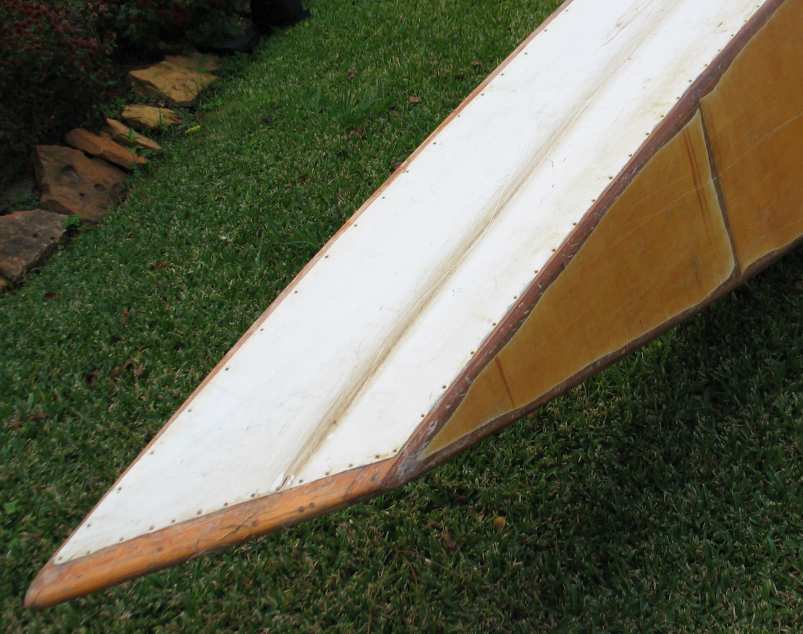
Here is a detail shot showing the frame
ends coming together. Sure, you could get fancy and bevel them to meet without
the "crack", but the real gain would be cosmetic; as you can see, it isn't
necessary. Again, I find the simplicity elegant, and most refreshing.
The small plywood deck, or breast hook, or whatever it's called, is fitted very simply, glued in place, and covered with a bit of fiberglass cloth to hold it in place, make it durable, and render it 100% waterproof. Note: Our panel of experts held a brief conference on proper boat part names; things like "sheer clamp", "stringer", "chine log", etc., etc., decided to heck with it, and shall just call 'em as we saw 'em and hope it makes sense. Okay, well, I decided that, because I'm the one who's typing this stuff. Anyway, please don't write to correct us, we already know we're hopeless. |
| A closer shot, showing one of the
"rungs" in the "ladder". There's gotta be at least a million ways to
handle the
joinery shown here, but in this case the pieces are very simply fitted and
glued, and a small piece of fiberglass cloth added to reinforce the
connection. The fiberglass patches are visible as slightly darkened areas
covering the joint.
For those inevitable souls among us who can't resist the temptation to complicate the matter, and/or overbuild, yes; mortise-and-tenon would work, mini-biscuits would work, dowels would work . . . have fun! But if you go with something fancy like the above, you won't need the fiberglass patch. If you use both, you're overbuilding, which adds more excess weight than robustness. Your boat will not come in under 20 pounds if you don't take care to keep it svelte -- high strength-to-weight ratios do not occur naturally, you must work towards them. Pretend you're building an airplane. |
 |
|
|
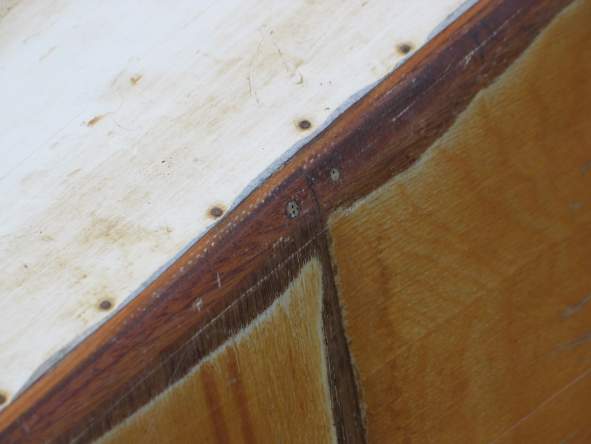
| Now we move to the exterior to have a look at how the side panels are finished out, and how the bottom is tacked on. A simple butt joint, reinforced with fiberglass cloth inside and out, is used to create a length of plywood sufficient to make a boat bottom. Plywood comes in 8-foot sheets, remember, and we're looking at a 14-foot boat? Well, that's the "board stretcher" right there. |
| Close-up showing joint in
bottom, and sheet metal tacked to side frames.
If you're not familiar with how these boat go together and would like a quick 'n' easy overview, take a peek here: Uncle John's General Store. Uncle John's is well known for providing excellent kits, plans, support, and service, by the way; that's why I chose them for this reference. Permission was kindly granted to link to their site. |
 |
|
|
Another detail shot showing how it all
comes together in the ends. (Is this the bow or stern? Beats the heck outa
me.)
I really don't know exactly how this thing is built, but if I were to guess, I'd say the stem pieces at the end of each "ladder" frame are 3/4" thick x 3" wide, and that the sheet metal is tacked about halfway across the 3" face. The unsheathed half is then rounded into the opposing side to create the bow shape. So how'd I do, Herb? Herb answers that my numbers ought to read 5/8" thick x 2 5/8" wide. |
|
|
| Elegant simplicity strikes again! Here we see the forward thwart doubling as the foot brace. A bar-style foot brace can easily be made adjustable (see next photo/blurb), and used to hook your toes under for increased boat control, or to lay back while passing under low obstacles like tree limbs, bridges, etc. |
| Typical canoe style adjustable foot brace. Two telescoping pieces of aluminum tube and two light weight aluminum angle pieces affixed to sides of hull with series of holes drilled in them. The telescoping action of the tube compensates for changing boat width as brace is moved forward or aft. Ends are flattened, holes are drilled, brace is secured to angle brackets with thumbscrews and wing nuts. Very simple, all components in the local hardware store. | 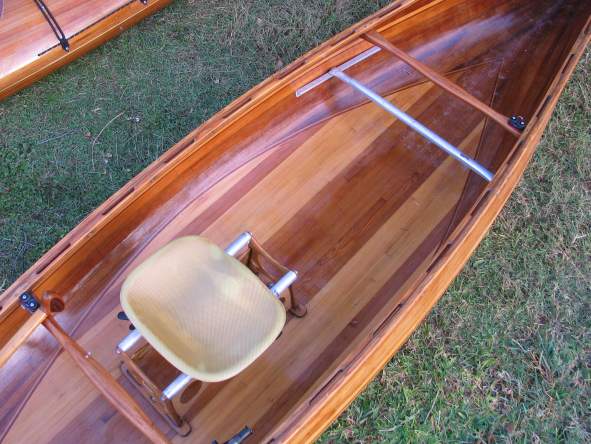 |
Herb has graciously agreed to post his email address here, and will be delighted to talk about his boats and methods as time allows. Write him at: hcottle@sbcglobal.net
He sent me an email back in the first week of December, 2008, chronicling one of his fishing adventures. Here it is, just as he wrote it:
Hi Kurt,
Just wanted to tell you about the longest and toughest battle I have ever had
with a fish. It lasted an hour and 43 minutes and it happened yesterday on
Horsepen Bayou.
I started fishing about 9:30 am, after launching at the Bay Area bridge, and
headed east toward the Middlebrook bridge. My clothes were still damp from a
tennis match so I slipped on light cover-alls with wind breaker over them. The
weather was still warm. Shortly after I launched, a cool NW wind came up and the
temperature started dropping.
After couple of hours, I had paddled and fished the mile, or so, to near the
Middlebrook bridge (where that big slough is). Had caught only two small bass
and was cold and discouraged.
For some reason, steam was coming off the water in that area and schools of shad
were really thick. I could feel my crankbait bouncing-off them on just about
every cast.
I saw a hook-line-and-and-sinker rig hanging in a bush near the water. Decided
it would be "great sport" to snag some of those shad, so I cut the
treble hook off that rig and tied it on my baitcasting outfit.
Snagging shad was great fun and I was proud of myself for the "skillful
fly-casting presentation" I was making to them. I even put one in the
cooler to clean later to see if it was edible; figuring that, if the economy
gets much worse, I could go back out there and snag enough shad to feed the
multitudes.
Hated to leave the fun but was really getting cold. As I was leaving the area I
noticed a big, dark object under the water: a huge alligator gar. I thought to
myself, "what are the odds?"; flipped the treble hook over the gar and
yanked back, knowing full well that it would be a miracle if the hook happened
to penetrate the gar's "armor-plated" scales. Result? Instant
"Old Man and The Sea" ( which wasn't too much of a transformation
since I was already OLD and there was sea water in the bayou).
The hook snagged the gar in one of its side fins. It took-off down the bayou and
I dropped the anchor and looked at my watch. It was 12:30 pm.
I adjusted the drag on my reel to put as much pressure on the fish as possible.
At full-drag the gar didn't' seem to slow down at all and I realized right away
that if I didn't do something soon, he was going to strip all the line off my
reel; so I pulled up the anchor.
Pretty soon the battle guidelines were established. I was able to get the line I
needed back by reeling and "skiing" behind the gar. When he changed
course, I moved the rod-tip in that direction and the boat followed that course.
If he ran under low-lying branches, I back-paddled and gave him line until he
cleared.
After a while, I thought, "this is cool; all I have to do is hang on and
guide and he will tow me all the way back to the Bay Area bridge!". I also
thought of ways of getting him out of the bayou; like maybe asking the guy,
operating the back-hoe near the bridge, if he'd scoop him up.
For some reason, however, after we had gotten about half-way back to the launch
point (we were near the UHCL bridge), the fish did a 180 and headed back east
and went all the way past the "starting point".
I thought the end was near as we approached an area where new trees had fallen
across the bayou and the surface was matted-over. I knew I couldn't follow him
past there. Incredibly, he did another about-face a few feet from there and
headed west again.
I looked at my watch and realized that it had been over an hour-and-a-half since
we had started and the gar didn't seem to be the least bit tired. I was though
(and frozen).
"Okay, you win", I said to myself and the gar and started to reel in
as much line as I could before I cut it. Surprisingly, the hook came out of the
gar's fin, just as I was reaching for my knife.
I'm sure the gar is telling his friends about "the one that got away".
I can't do the same. I never could have caught HIM in the first place.
So, that's my story. I realize that fish stories are the most-fun to tell and
the least-fun to listen too.
If you are still with me, thanks for listening.
Herb
Bonus Boat Handling Lesson!
December 28, 2011
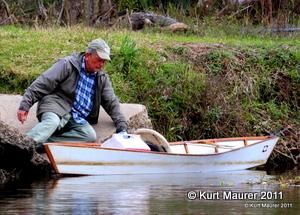
I pull a bit of a dirty trick on the poor guy. As he gets ready to enter his boat one day recently, he asks me not to watch, that it isn't pretty. Well, I not only watch, but shoot a bunch of pictures too, and now present them here for all to enjoy -- and LEARN FROM. I mean, once he's safely afloat, I ask him how many times he fell in launching this way? "Why, never" is his reply, as if it's a silly question. And so it is, for that is what I thought. He's doing everything exactly right according to this certified paddle instructor, so I thought I'd let Herb demonstrate the correct and safe way to enter a small boat without getting wet. It's beautifully done!
|
|
|
|
|
|
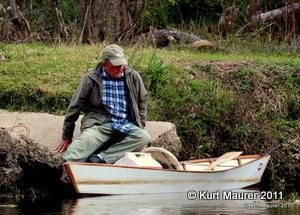
First, of course, get the boat in the water. |
Position boat, then sit or lay down next to it. |
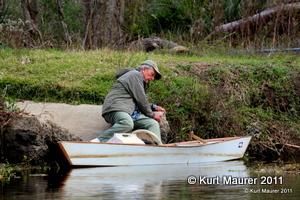
Aim your feet for the cockpit centerline. |
And put 'em there. |
|
|
|
|
|
|
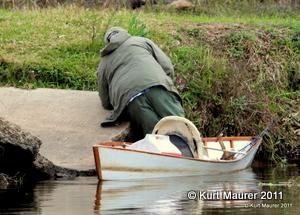
Keep upper body on ground or dock.... |
....While installing lower body in boat. |
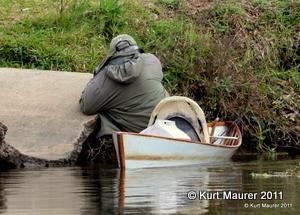
When fanny is planted, balance and release. |
Nothing to it! |
Return to the Sawdust Factory Table of Contents
Email Kurt Maurer at NGC704@aol.com